1. BeanFactory和ApplicationContext的区别
- BeanFactory是Spring的早期接口,称为Spring的Bean工厂;ApplicationContext是后期更高级接口,称之为Spring容器;
- ApplicationContext在BeanFactory基础上对功能进行了扩展,例如:监听功能、国际化功能等。BeanFactory的API更偏向底层,ApplicationContext的API大多数是对这些底层API的封装;
- Bean创建的主要逻辑和功能都被封装在BeanFactory中,ApplicationContext不仅继承了BeanFactory,而且ApplicationContext内部还维护着BeanFactory的引用,所以,ApplicationContext与BeanFactory既有继承关系,又有融合关系。
- Bean的初始化时机不同,原始BeanFactory是在首次调用getBean时才进行Bean的创建,而ApplicationContext则是配置文件加载,容器一创建就将Bean都实例化并初始化好。
2. IOC、DI是什么
2.1 IOC
- IOC就是控制反转,以前手动去new 对象,创建对象的权利在研发人员中,现在将创建对象的权利以及对象之间的关系交给第三方容器负责;
- 总结:控制反转是一种思想,目的是降低程序耦合度,提高了程序扩展力;
2.2 DI
- DI是依赖注入,依赖注入实现了控制反转的思想。
- 依赖注入指的就是spring创建对象的过程中,将对象依赖属性通过配置进行注入。
- 常见的注入:
3. Bean的作用域
4. bean的生命周期
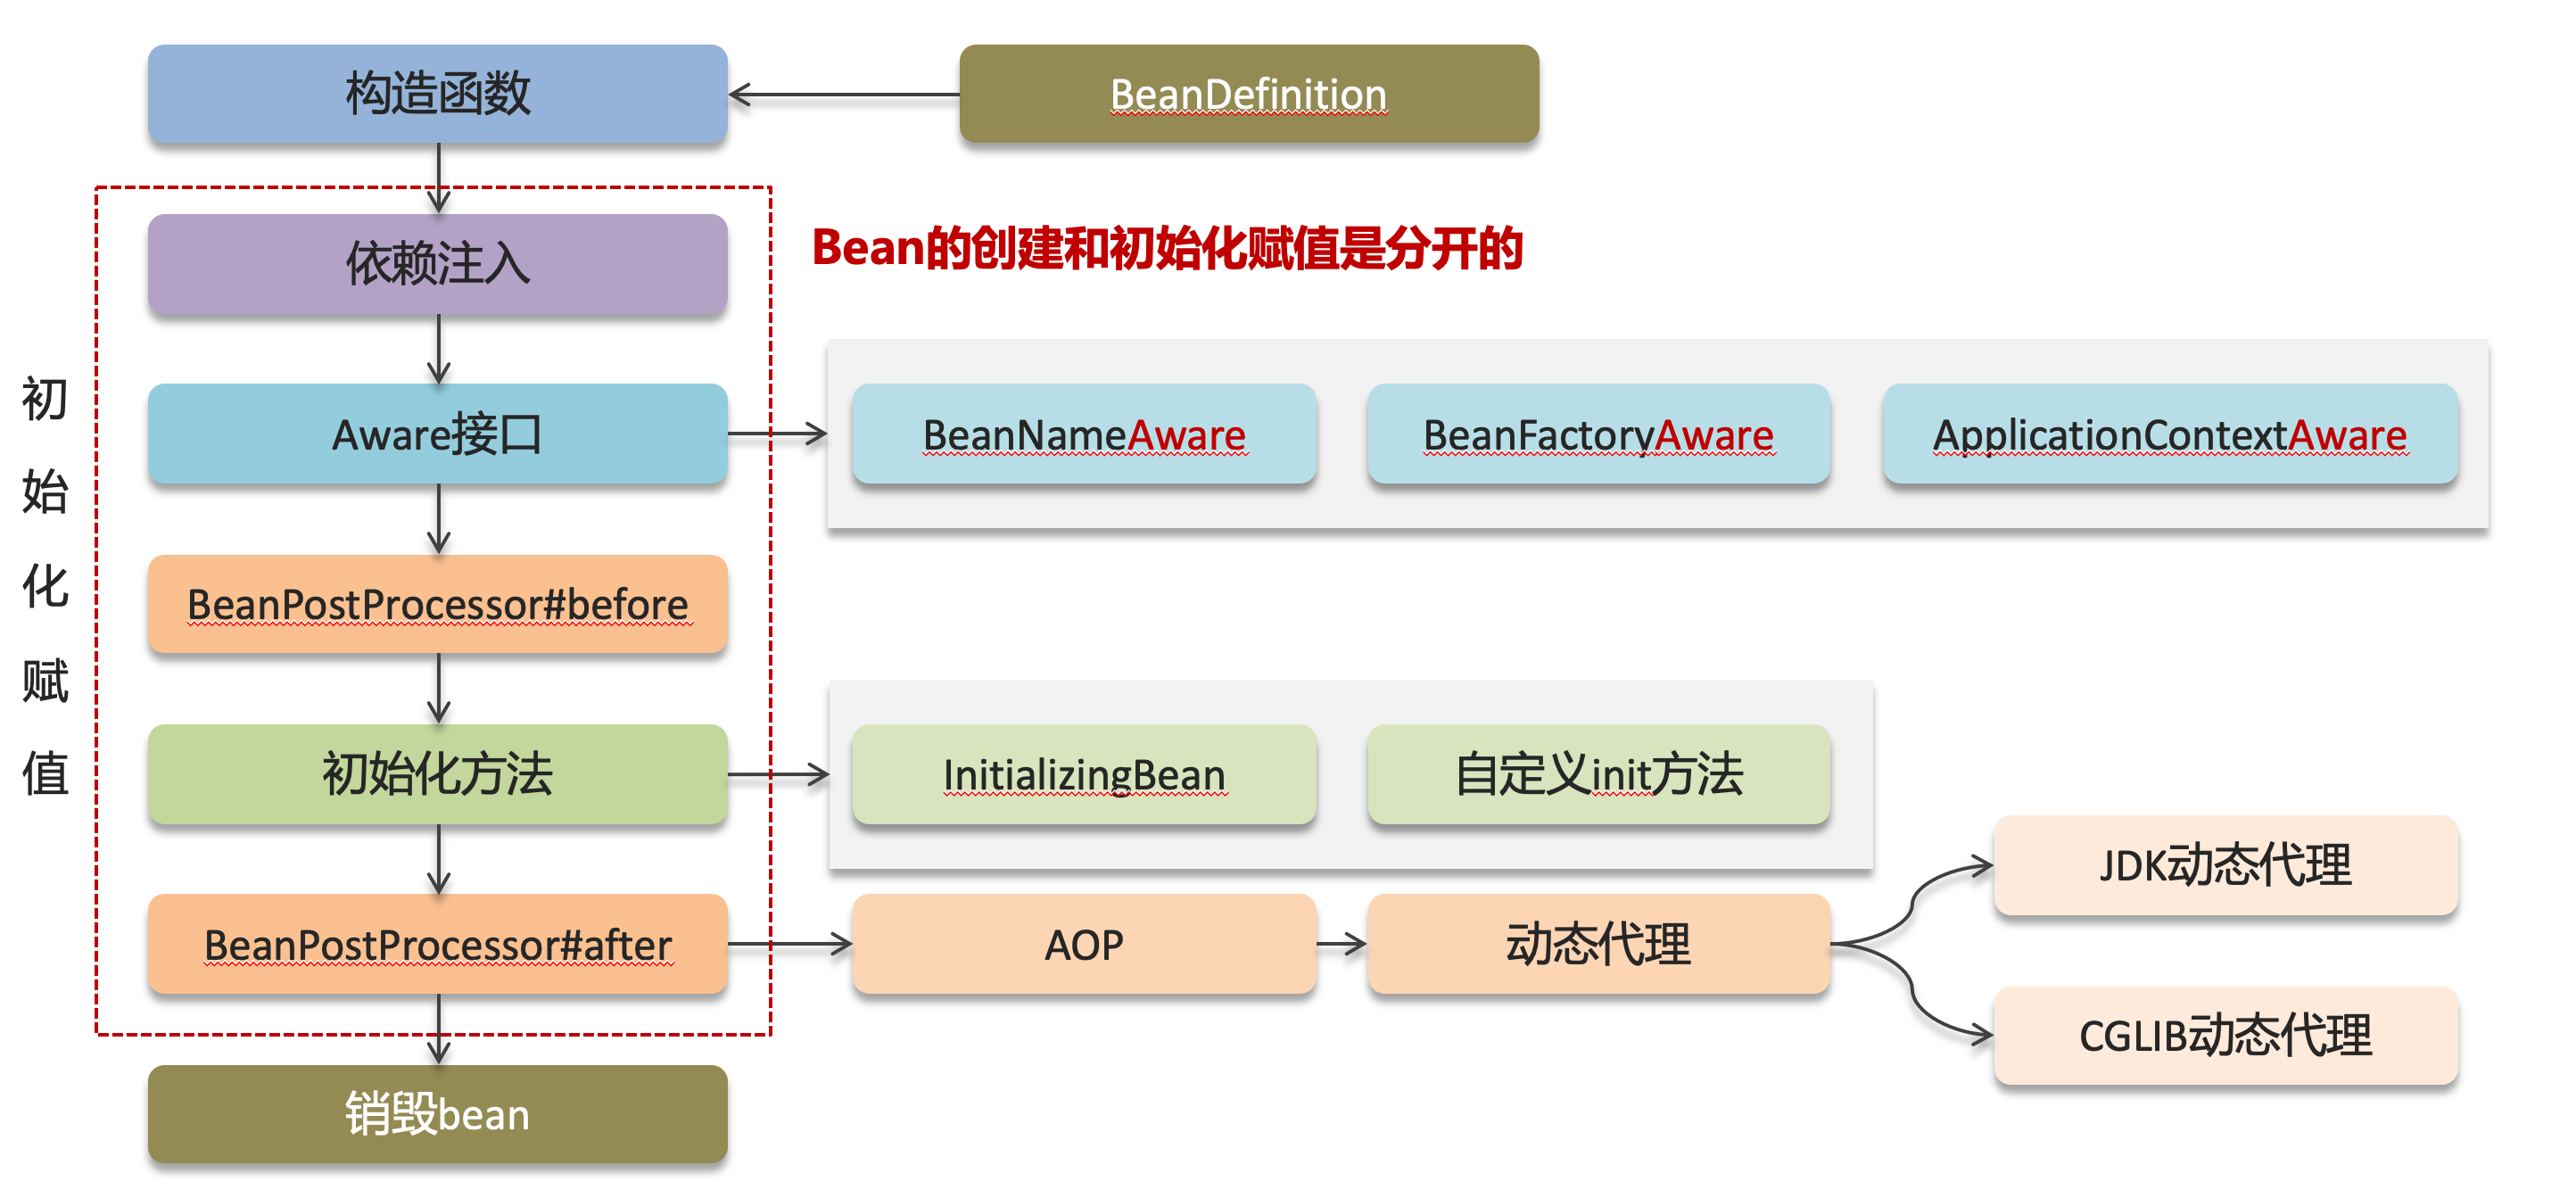
通过BeanDefinition获取bean的定义信息;
- 作用:从配置文件(如XML、Java配置类)中读取Bean的配置信息,生成
BeanDefinition对象,这些对象包含了Bean的类名、作用域、依赖关系等信息。
调用构造函数实例化bean;
- 作用:根据
BeanDefinition中的信息,使用反射机制调用Bean的构造函数创建一个Bean实例。
bean的依赖注入;
- 作用:根据Bean的依赖关系,通过字段、setter方法或构造函数注入所需的依赖对象。
处理Aware接口(BeanNameAware、BeanFactoryAware、ApplicationContextAware);
- 作用:如果Bean实现了这些Aware接口,Spring会在实例化后调用相应的方法,将BeanName、BeanFactory、ApplicationContext等对象传递给Bean。
Bean的后置处理器BeanPostProcessor-前置;
- 作用:在Bean的初始化方法调用之前执行,可以在此阶段对Bean进行增强。
初始化方法(InitializingBean、init-method);
- 作用:如果Bean实现了
InitializingBean接口,其afterPropertiesSet方法会被调用;或者通过配置指定了init-method,Spring会调用这个方法。这个阶段用于完成Bean的初始化工作。
Bean的后置处理器BeanPostProcessor-后置;
- 作用:在Bean的初始化方法调用之后执行,可以在此阶段对Bean进行增强。
销毁bean;
- 作用:当容器关闭时,Spring会销毁所有的Bean。如果Bean实现了
DisposableBean接口,其destroy方法会被调用;或者通过配置指定了destroy-method,Spring会调用这个方法。
代码示例:
1
2
3
4
| @Configuration
@ComponentScan("com.itheima.lifecycle")
public class SpringConfig {
}
|
1
2
3
4
5
6
7
8
9
10
11
12
13
14
15
16
17
18
19
20
21
22
23
24
25
26
27
28
29
30
31
32
33
34
| @Component
public class MyBeanPostProcessor implements BeanPostProcessor {
@Override
public Object postProcessBeforeInitialization(Object bean, String beanName) throws BeansException {
if (beanName.equals("user")) {
System.out.println("postProcessBeforeInitialization方法执行了->user对象初始化方法前开始增强....");
}
return bean;
}
@Override
public Object postProcessAfterInitialization(Object bean, String beanName) throws BeansException {
if (beanName.equals("user")) {
System.out.println("postProcessAfterInitialization->user对象初始化方法后开始增强....");
}
return bean;
}
}
|
1
2
3
4
5
6
7
8
9
10
11
12
13
14
15
16
17
18
19
20
21
22
23
24
25
26
27
28
29
30
31
32
33
34
35
36
37
38
39
40
41
42
43
44
45
| @Component
public class User implements BeanNameAware, BeanFactoryAware, ApplicationContextAware, InitializingBean {
public User() {
System.out.println("User的构造方法执行了.........");
}
private String name ;
@Value("张三")
public void setName(String name) {
System.out.println("setName方法执行了.........");
}
@Override
public void setBeanName(String name) {
System.out.println("setBeanName方法执行了.........");
}
@Override
public void setBeanFactory(BeanFactory beanFactory) throws BeansException {
System.out.println("setBeanFactory方法执行了.........");
}
@Override
public void setApplicationContext(ApplicationContext applicationContext) throws BeansException {
System.out.println("setApplicationContext方法执行了........");
}
@PostConstruct
public void init() {
System.out.println("init方法执行了.................");
}
@Override
public void afterPropertiesSet() throws Exception {
System.out.println("afterPropertiesSet方法执行了........");
}
@PreDestroy
public void destroy() {
System.out.println("destroy方法执行了...............");
}
}
|
1
2
3
4
5
6
7
8
9
10
| public class UserTest {
public static void main(String[] args) {
ApplicationContext ctx = new AnnotationConfigApplicationContext(SpringConfig.class);
User user = ctx.getBean(User.class);
System.out.println(user);
((AnnotationConfigApplicationContext)ctx).close();
}
}
|
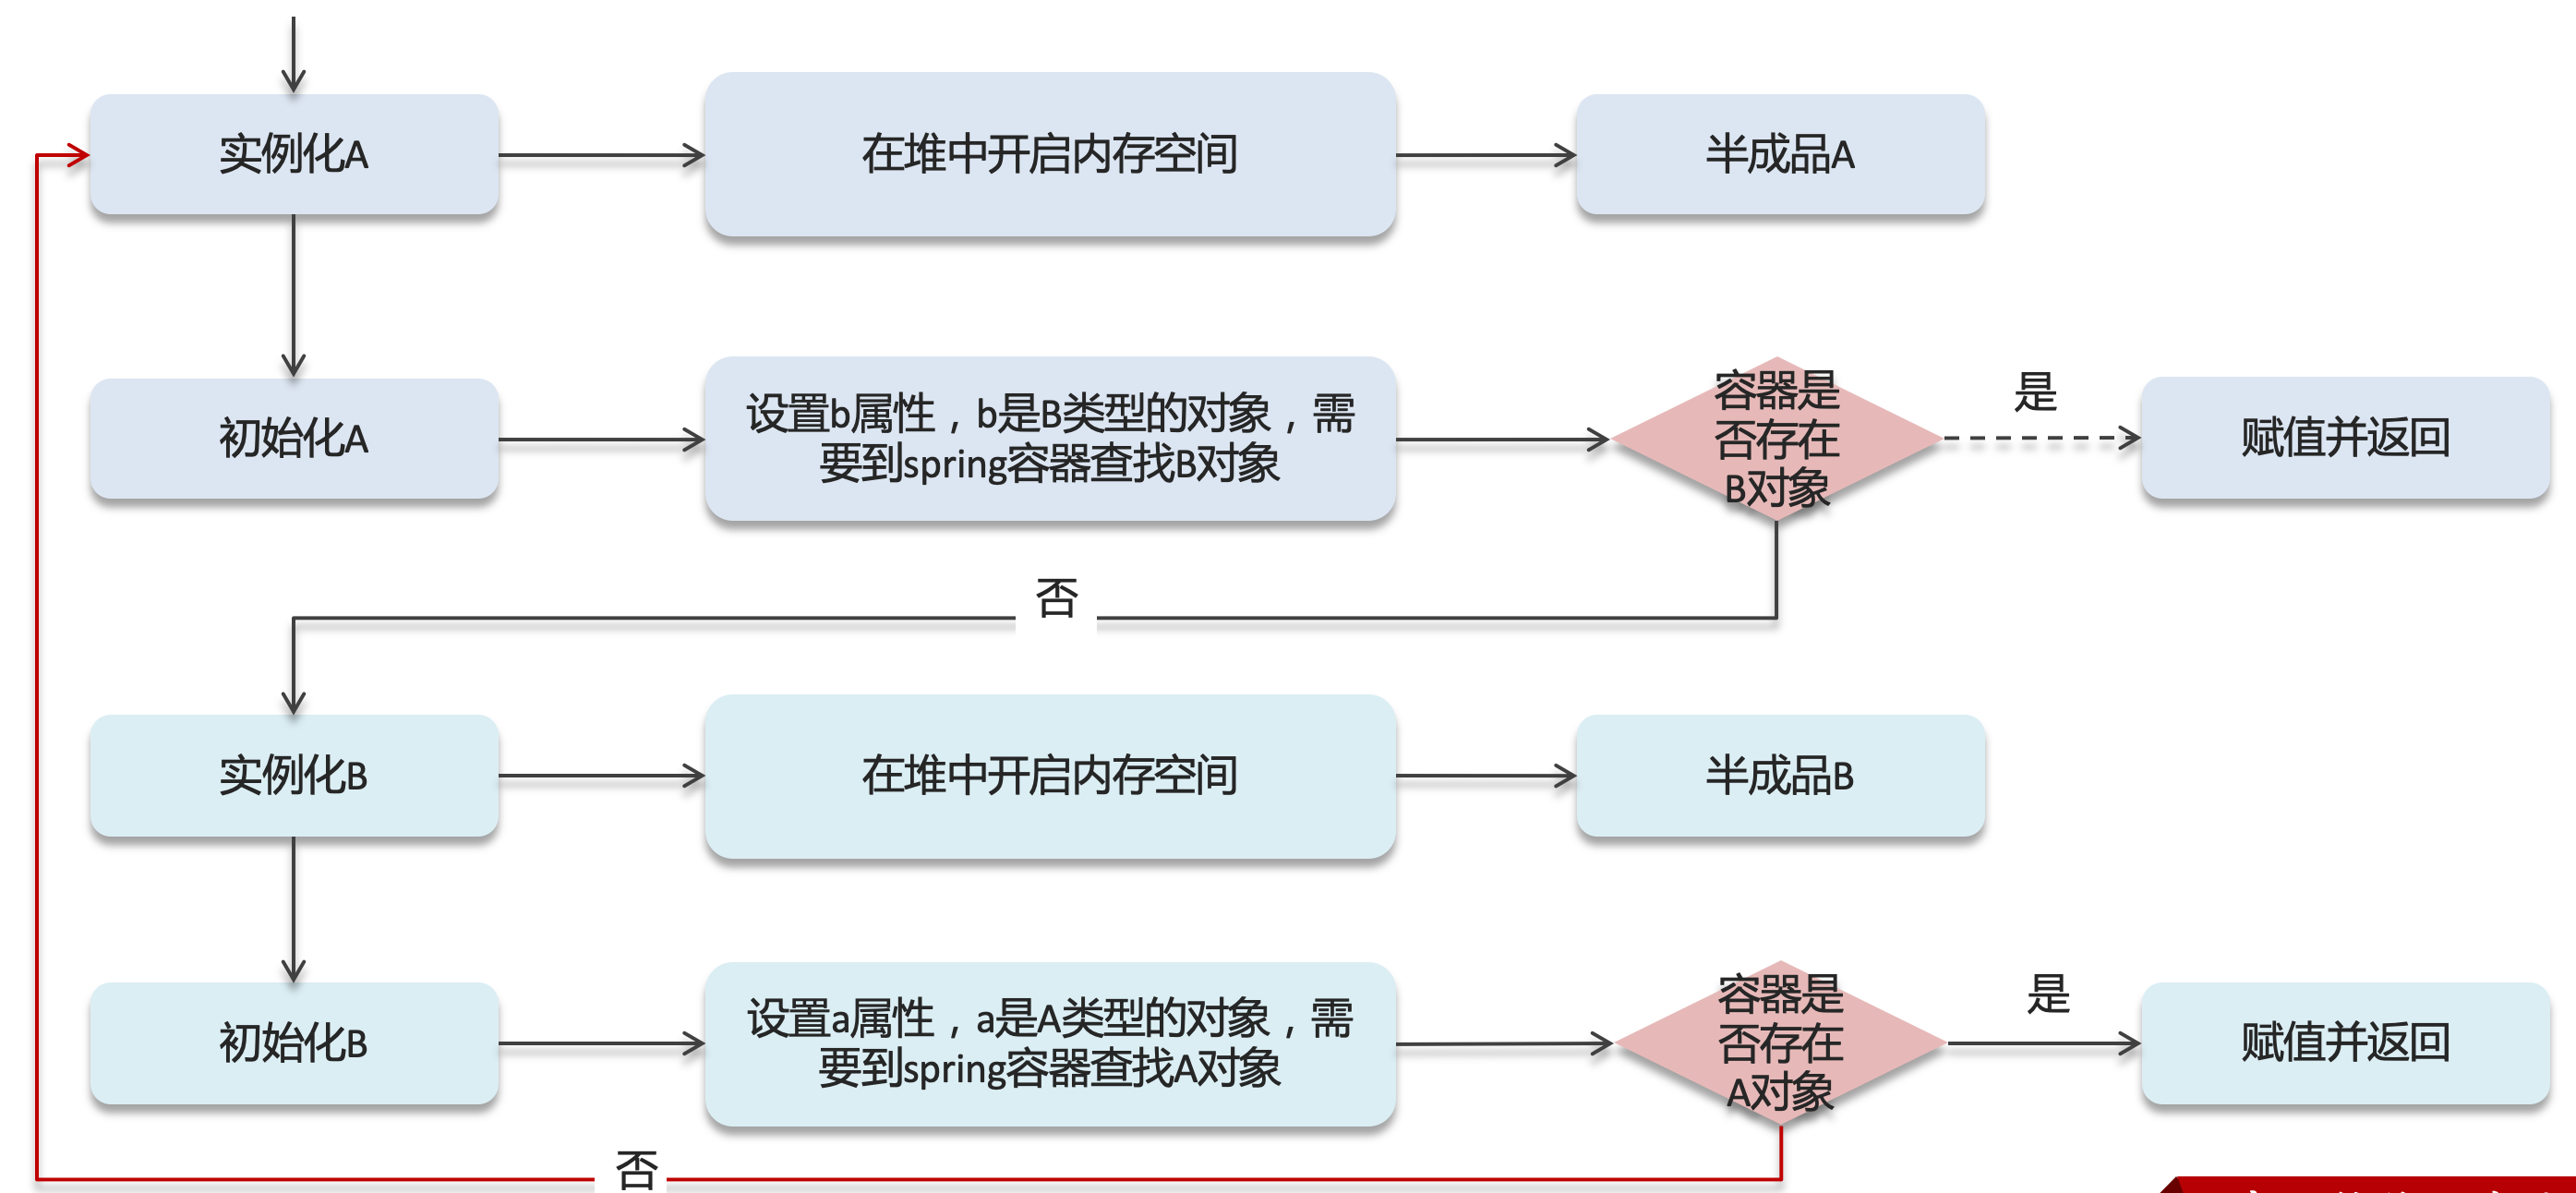
5. 循环依赖如何解决
5.1 循环依赖的产生
举例:
1
2
3
4
5
| @Component
public class A {
@Autowired
private B b;
}
|
1
2
3
4
5
| @Component
public class B {
@Autowired
private A a;
}
|
此时就产生了循环依赖
过程图解:
5.2 spring的三种级别缓存
1
2
3
4
5
6
| public class DefaultSingletonBeanRegistry extends SimpleAliasRegistry implements SingletonBeanRegistry {
private static final int SUPPRESSED_EXCEPTIONS_LIMIT = 100;
private final Map<String, Object> singletonObjects = new ConcurrentHashMap(256);
private final Map<String, ObjectFactory<?>> singletonFactories = new HashMap(16);
private final Map<String, Object> earlySingletonObjects = new ConcurrentHashMap(16);
}
|
5.2.1 一级缓存
- 作用:单例池,缓存已经经历了完整的生命周期,已经初始化完成的bean对象。即:已经走完了生命周期的bean。
- 一级缓存无法解决循环依赖的问题,因为此时bean是已经完成整个生命周期的。
5.2.2 二级缓存
5.2.3 三级缓存
5.3 构造方法出现循环依赖怎么办?
6. bean是不是线程安全的
bean可以通过@scope注解设置单实例还是多实例,singleton标记在容器内部只有一个Bean,prototype标记在容器内部可以有多个bean。
bean不是线程安全的。
1
2
3
4
5
6
7
8
9
10
11
12
13
14
15
| @Controller
@RequestMapping("/user")
public class UserController {
private int count;
@Autowired
private UserService userService;
@GetMapping("/getById/{id}")
public User getById(@PathVariable("id") Integer id){
count++;
System.out.println(count);
return userService.getById(id);
}
}
|
在该代码中
- count是成员变量,当有多个请求过来的时候,都可以对count进行修改,因此存在线程安全问题。
- Spring bean并没有可变的状态(比如Service类和DAO类),所以在某种程度上说Spring的单例bean是线程安全的。
Spring框架中有一个@Scope注解,默认的值就是singleton,单例的。因为一般在spring的bean的中都是注入无状态的对象,没有线程安全问题,如果在bean中定义了可修改的成员变量(count),是要考虑线程安全问题的,可以使用多例或者加锁来解决
7. AOP是什么
- AOP称为面向切面编程,用于将那些与业务无关,但却对多个对象产生影响的公共行为和逻辑,抽取并封装为一个可重用的模块,这个模块被命名为“切面”(Aspect),减少系统中的重复代码,降低了模块间的耦合度,同时提高了系统的可维护性。
- 核心是:使用aop中的环绕通知+切点表达式(找到要记录日志的方法),通过环绕通知的参数获取请求方法的参数(类、方法、注解、请求方式等),获取到这些参数以后,保存到数据库
- 常见的操作:
- 记录操作日志()
- 缓存处理
- Spring中内置的事务处理
7.1 记录操作日志
1
2
3
4
5
6
7
8
9
10
| @Target({ ElementType.PARAMETER, ElementType.METHOD })
@Retention(RetentionPolicy.RUNTIME)
@Documented
public @interface Log {
public String name() default "";
}
|
1
2
3
4
5
6
7
8
9
10
11
12
13
14
15
16
17
18
19
20
21
22
23
24
25
26
27
28
29
30
31
32
33
34
35
36
37
38
39
40
41
42
43
44
45
46
47
48
49
50
51
52
53
54
55
56
57
58
59
60
61
62
63
64
65
66
67
68
69
70
71
72
73
74
75
76
| @Component
@Aspect
public class SysAspect {
@Pointcut("@annotation(com.itheima.annotation.Log)")
private void pointcut() {
}
@Pointcut("execution(* com.itheima.service.*.*(..))")
public void pointcut2(){}
@Around("pointcut2()")
public Object around(ProceedingJoinPoint joinPoint) throws Throwable {
Signature signature = joinPoint.getSignature();
MethodSignature methodSignature = (MethodSignature) signature;
Method method = methodSignature.getMethod();
if(method != null){
Log logAnnotation = method.getAnnotation(Log.class);
System.out.println(logAnnotation.name());
}
String name = method.getName();
System.out.println(name);
RequestAttributes reqa = RequestContextHolder.getRequestAttributes();
ServletRequestAttributes sra = (ServletRequestAttributes)reqa;
HttpServletRequest request = sra.getRequest();
String url = request.getRequestURI().toString();
System.out.println(url);
String methodName = request.getMethod();
System.out.println(methodName);
String ipAddr = getIpAddr(request);
System.out.println(ipAddr);
System.out.println(new Date());
return joinPoint.proceed();
}
public String getIpAddr(HttpServletRequest request){
String ip = request.getHeader("x-forwarded-for");
if(ip == null || ip.length() == 0 || "unknown".equalsIgnoreCase(ip)){
ip = request.getHeader("Proxy-Client-IP");
}
if(ip == null || ip.length() == 0 || "unknown".equalsIgnoreCase(ip)){
ip = request.getHeader("WL-Proxy-Client-IP");
}
if(ip == null || ip.length() == 0 || "unknown".equalsIgnoreCase(ip)){
ip = request.getRemoteAddr();
}
return "0:0:0:0:0:0:0:1".equals(ip) ? "127.0.0.1" : ip;
}
}
|
1
2
3
4
5
6
7
8
9
10
11
12
| @RestController
@RequestMapping("/user")
public class UserController {
@Autowired
private UserService userService;
@RequestMapping("/getById/{id}")
@ResponseBody
@Log(name = "根据id获取用户")
public User getById(@PathVariable("id") Integer id) {
return userService.getById(id);
}
}
|
8. AOP的实现
8.1 原理
8.1.1 JDK动态代理
- 通过 java.lang.reflect.Proxy类 的 newProxyInstance方法 创建代理类。
- newProxyInstance方法:

1. 参数一:类加载器
1. 参数二:所增强方法所在的类,这个类实现的接口,支持多个接口
1. 参数三:实现InvocationHandle接口,重写invoke方法来添加新的功能
接口:
1
2
3
4
| public interface UserDao {
public int add(int a, int b);
public int multi(int a, int b);
}
|
实现类:
1
2
3
4
5
6
7
8
9
10
11
| public class UserDaoImpl implements UserDao {
@Override
public int add(int a, int b) {
return a+b;
}
@Override
public int multi(int a, int b) {
return a*b;
}
}
|
增强类
1
2
3
4
5
6
7
8
9
10
11
12
13
14
15
16
17
18
19
20
| public class UserDaoProxy implements InvocationHandler {
Object obj;
public UserDaoProxy(Object obj){
this.obj = obj;
}
@Override
public Object invoke(Object proxy, Method method, Object[] args) throws Throwable {
System.out.println("进入" + method.getName() + "方法,这是新增的代码,参数有" + Arrays.toString(args));
Object invoke = method.invoke(obj, args);
System.out.println("方法原先的内容执行完了");
return invoke;
}
}
|
测试:
1
2
3
4
5
6
7
8
9
10
11
12
13
14
15
16
17
18
19
| public class Main {
@Test
public void test1(){
Class[] interfaces = {UserDao.class};
UserDao userDao = new UserDaoImpl();
UserDao userDaoProxy = (UserDao) Proxy.newProxyInstance(Main.class.getClassLoader(), interfaces, new UserDaoProxy(userDao));
int result = userDaoProxy.add(1, 2);
System.out.println(result);
}
}
|

8.1.2 CGLIB动态代理
目标类
1
2
3
4
5
| public class TargetClass {
public void doSomething() {
System.out.println("目标方法");
}
}
|
实现MethodInterceptor接口
1
2
3
4
5
6
7
8
9
10
11
12
13
| import net.sf.cglib.proxy.MethodInterceptor;
import net.sf.cglib.proxy.MethodProxy;
import java.lang.reflect.Method;
public class CustomMethodInterceptor implements MethodInterceptor {
@Override
public Object intercept(Object obj, Method method, Object[] args, MethodProxy proxy) throws Throwable {
System.out.println("执行目标方法之前");
Object result = proxy.invokeSuper(obj, args);
System.out.println("执行目标方法之后");
return result;
}
}
|
测试
1
2
3
4
5
6
7
8
9
10
11
12
| import net.sf.cglib.proxy.Enhancer;
public class CglibDynamicProxyDemo {
public static void main(String[] args) {
Enhancer enhancer = new Enhancer();
enhancer.setSuperclass(TargetClass.class);
enhancer.setCallback(new CustomMethodInterceptor());
TargetClass proxy = (TargetClass) enhancer.create();
proxy.doSomething();
}
}
|
结果
8.2 基于AspectJ实现AOP操作
8.2.1 AOP相关术语
- 连接点:类中可以被增强的方法,称为连接点。
- 切入点:实际被增强的方法,称为切入点。
- 通知:增强的那一部分逻辑代码。通知有多种类型:
- 前置通知:增强部分代码在原代码前面。
- 后置通知:增强部分代码在原代码后面。
- 环绕通知:增强部分代码既有在原代码前面,也有在原代码后面。
- 异常通知:原代码发生异常后才会执行。
- 最终通知:类似与finally那一部分
- 切面:指把通知应用到切入点这一个动作。
8.2.2 切入点表达式
语法:execution([权限修饰符] [返回类型] [类全路径] [方法名称] [参数列表])
对 com.atguigu.dao.BookDao 类里面的 add 进行增强
1
| execution(* com.auguigu.dao.BookDao.add(..))
|
对 com.atguigu.dao.BookDao 类里面的所有的方法进行增强
1
| execution(* com.atguigu.dao.BookDao.*(..))
|
对 com.atguigu.dao 包里面所有类,类里面所有方法进行增强
1
| execution(* com.atguigu.dao.*.* (..))
|
8.3 基于注解实现AOP
1
2
3
4
5
6
| @Component
public class User {
public void add(){
System.out.println("User.add()");
}
}
|
1
2
3
4
5
6
7
8
9
10
11
12
13
14
15
16
17
18
19
20
21
22
23
24
25
26
27
28
29
30
31
32
33
34
35
36
37
38
39
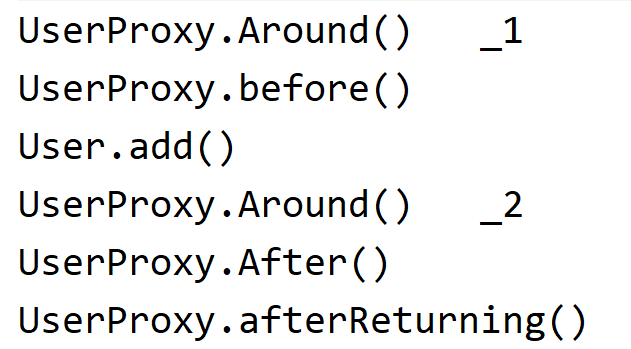
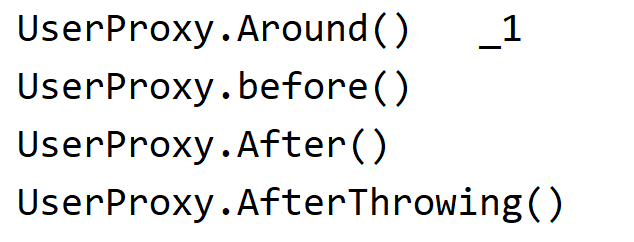
| @Component
@Aspect
public class UserProxy {
@Before(value="execution(* com.oymn.spring5.User.add(..))")
public void before(){
System.out.println("UserProxy.before()");
}
@AfterReturning(value="execution(* com.oymn.spring5.User.add(..))")
public void afterReturning(){
System.out.println("UserProxy.afterReturning()");
}
@After(value="execution(* com.oymn.spring5.User.add(..))")
public void After(){
System.out.println("UserProxy.After()");
}
@AfterThrowing(value="execution(* com.oymn.spring5.User.add(..))")
public void AfterThrowing(){
System.out.println("UserProxy.AfterThrowing()");
}
@Around(value="execution(* com.oymn.spring5.User.add(..))")
public void Around(ProceedingJoinPoint proceedingJoinPoint) throws Throwable{
System.out.println("UserProxy.Around() _1");
proceedingJoinPoint.proceed();
System.out.println("UserProxy.Around() _2");
}
}
|
配置类
1
2
3
4
5
6
| @Configuration
@ComponentScan(basePackages = "com.oymn.spring5")
@EnableAspectJAutoProxy(proxyTargetClass = true)
public class Config {
}
|
测试
1
2
3
4
5
6
| @Test
public void test2(){
ClassPathXmlApplicationContext context = new ClassPathXmlApplicationContext("bean1.xml");
User user = context.getBean("user", User.class);
user.add();
}
|
输出
异常
1
2
3
4
| public void add(){
int i = 1/0;
System.out.println("User.add()");
}
|
对于上面的例子,有很多通知的切入点都是相同的方法,因此,可以将该切入点进行抽取:通过@Pointcut注解
1
2
3
4
5
6
7
8
9
10
| @Pointcut(value="execution(* com.oymn.spring5.User.add(..))")
public void pointDemo(){
}
@Before(value="pointDemo()")
public void before(){
System.out.println("UserProxy.before()");
}
|
8.4 优先级
当有多个增强类对同一方法进行增强时,可以通过**@Order(数字值)来设置增强类的优先级,数字越小优先级越高。**
1
2
3
4
| @Component
@Aspect
@Order(1)
public class PersonProxy
|
9. spring事务实现方式
9.1 编程式事务
- 需使用TransactionTemplate来进行实现,对业务代码有侵入性,项目中很少使用
9.2 声明式事务
- 其本质是通过AOP功能,对方法前后进行拦截,在执行方法之前开启事务,在执行完目标方法之后根据执行情况提交或者回滚事务。
10. spring事务失效的场景
- 异常捕获处理
- 抛出检查异常
- 非public方法
10.1 异常捕获处理
1
2
3
4
5
6
7
8
9
10
11
12
13
14
15
16
17
18
19
20
| @Transactional
public void update(Integer from, Integer to, Double money) {
try {
Account fromAccount = accountDao.selectById(from);
if (fromAccount.getMoney() - money >= 0) {
fromAccount.setMoney(fromAccount.getMoney() - money);
accountDao.updateById(fromAccount);
int a = 1/0;
Account toAccount = accountDao.selectById(to);
toAccount.setMoney(toAccount.getMoney() + money);
accountDao.updateById(toAccount);
}
} catch (Exception e) {
e.printStackTrace();
}
}
|
原因:事务通知只有捉到了目标抛出的异常,才能进行后续的回滚处理,如果目标自己处理掉异常,事务通知无法知悉,如果没有进行捕获也能正常回滚。
解决:在catch块添加throw new RuntimeException(e)抛出
10.2 抛出检查异常
1
2
3
4
5
6
7
8
9
10
11
12
13
14
15
16
| @Transactional
public void update(Integer from, Integer to, Double money) throws FileNotFoundException {
Account fromAccount = accountDao.selectById(from);
if (fromAccount.getMoney() - money >= 0) {
fromAccount.setMoney(fromAccount.getMoney() - money);
accountDao.updateById(fromAccount);
new FileInputStream("dddd");
Account toAccount = accountDao.selectById(to);
toAccount.setMoney(toAccount.getMoney() + money);
accountDao.updateById(toAccount);
}
}
|
原因:在方法中抛出了一个文件找不到异常,而spring默认只会回滚非检查异常(RunTimeException)。
解决:配置rollbackFor属性,@Transactional(rollbackFor=Exception.class)
10.3 非public方法导致的事务失效
1
2
3
4
5
6
7
8
9
10
11
12
13
14
15
16
17
| @Transactional(rollbackFor = Exception.class)
private void update(Integer from, Integer to, Double money) throws FileNotFoundException {
Account fromAccount = accountDao.selectById(from);
if (fromAccount.getMoney() - money >= 0) {
fromAccount.setMoney(fromAccount.getMoney() - money);
accountDao.updateById(fromAccount);
new FileInputStream("dddd");
Account toAccount = accountDao.selectById(to);
toAccount.setMoney(toAccount.getMoney() + money);
accountDao.updateById(toAccount);
}
}
|
原因:Spring 为方法创建代理、添加事务通知、前提条件都是该方法是 public 的
解决:改为 public 方法
11. spring事务传播规则
在spring中一共有7中传播行为,REQUIRED、NESTED、REQUIRES_NEW常用
1
2
3
4
5
6
7
8
9
10
11
12
13
| REQUIRED:如果当前没有事务,就新建一个事务。如果当前存在事务,则加入这个事务。
NESTED:如果当前没有事务,就新建一个事务。如果当前事务存在,则执行一个嵌套事务。
REQUIRES_NEW:如果当前没有事务,就新建一个事务。如果当前存在事务,把当前事务挂起,并且自己创建一个新的事务给自己使用。
SUPPORTS:如果当前没有事务,就以非事务方式执行。 如果当前有事务,则使用事务。
NOT_SUPPORTED:以非事务方式执行操作,如果当前存在事务,就把当前事务挂起。
MANDATORY:以事务方式执行,如果当前没有事务,就抛出异常。
NEVER:以非事务方式执行,如果当前存在事务,则抛出异常。
|
场景示例
有个注册业务,注册时需要记录登录账号、密码、身份证号、姓名、手机号这5个信息,涉及三张表,分别是t_user_account、t_user_idcard、t_user_phone,刚开始的业务要求这些都不能为空,如果其中一个发生异常,那么其余已经插入的全部回滚(这些异常是我用作数据校验时抛出的,正常生产上会先进行数据校验,校验成功了再更改数据库,我这里为了演示@Transactional的回滚效果,先更改数据,如果校验不通过,便会通过spring的事务进行回滚)。
1
2
3
4
5
6
7
8
9
| @Data
public class UserVO {
private Long id;
private String userAccount;
private String userPwd;
private String phoneNum;
private String userName;
private String IDCard;
}
|
1
2
3
4
5
6
7
8
9
10
11
12
13
14
15
16
17
18
19
| @Controller
public class UserController {
@Autowired
private UserService userService;
public void register(UserVO userVO) {
userService.insertId(userVO);
try {
userService.register(userVO);
} catch (Exception e) {
e.printStackTrace();
}
}
}
|
1
2
3
4
5
6
| public interface UserService {
void insertId(UserVO userVO);
void register(UserVO userVO);
}
|
1
2
3
4
5
6
7
8
9
10
11
12
13
14
15
16
17
18
19
20
21
22
23
24
25
26
27
28
29
30
31
32
33
34
| @Service
public class UserServiceImpl implements UserService {
@Autowired
private JdbcTemplate jdbcTemplate;
@Autowired
private UserDao userDao;
@Override
public void insertId(UserVO userVO) {
String sql1 = "insert into t_user_account (user_id) values (?)";
jdbcTemplate.update(sql1,userVO.getId());
String sql2 = "insert into t_user_idcard (user_id) values (?)";
jdbcTemplate.update(sql2,userVO.getId());
String sql3 = "insert into t_user_phone (user_id) values (?)";
jdbcTemplate.update(sql3,userVO.getId());
}
@Transactional(propagation = Propagation.REQUIRED)
@Override
public void register(UserVO userVO) {
userDao.insertAccountAndPwd(userVO);
String sql1 = "update t_user_phone set phone_num = ? where user_id = ?";
jdbcTemplate.update(sql1,userVO.getPhoneNum(),userVO.getId());
if (userVO.getPhoneNum() == null) {
throw new RuntimeException("手机号码不能为空");
}
userDao.insertIDcardAndName(userVO);
}
}
|
注:这里选择抛出的是RuntimeException,该异常是运行时异常,如果不做异常回滚的配置,默认非运行时异常(比如我刚开始抛出的是Exception),则不会发生回滚。
1
2
3
4
5
6
7
8
| public interface UserDao {
void insertAccountAndPwd(UserVO userVO);
void insertIDcardAndName(UserVO userVO);
}
|
1
2
3
4
5
6
7
8
9
10
11
12
13
14
15
16
17
18
19
20
21
22
23
24
25
26
27
28
29
30
31
32
33
34
35
| @Repository
public class UserDaoImpl implements UserDao {
@Autowired
private JdbcTemplate jdbcTemplate;
@Transactional(propagation = Propagation.REQUIRED)
@Override
public void insertAccountAndPwd(UserVO userVO) {
String sql1 = "update t_user_account set user_account = ?, user_pwd = ? where user_id = ?";
jdbcTemplate.update(sql1,userVO.getUserAccount(),userVO.getUserPwd(),userVO.getId());
if (userVO.getUserAccount() == null) {
throw new RuntimeException("账号不能为空");
}
if (userVO.getUserPwd() == null) {
throw new RuntimeException("密码不能为空");
}
}
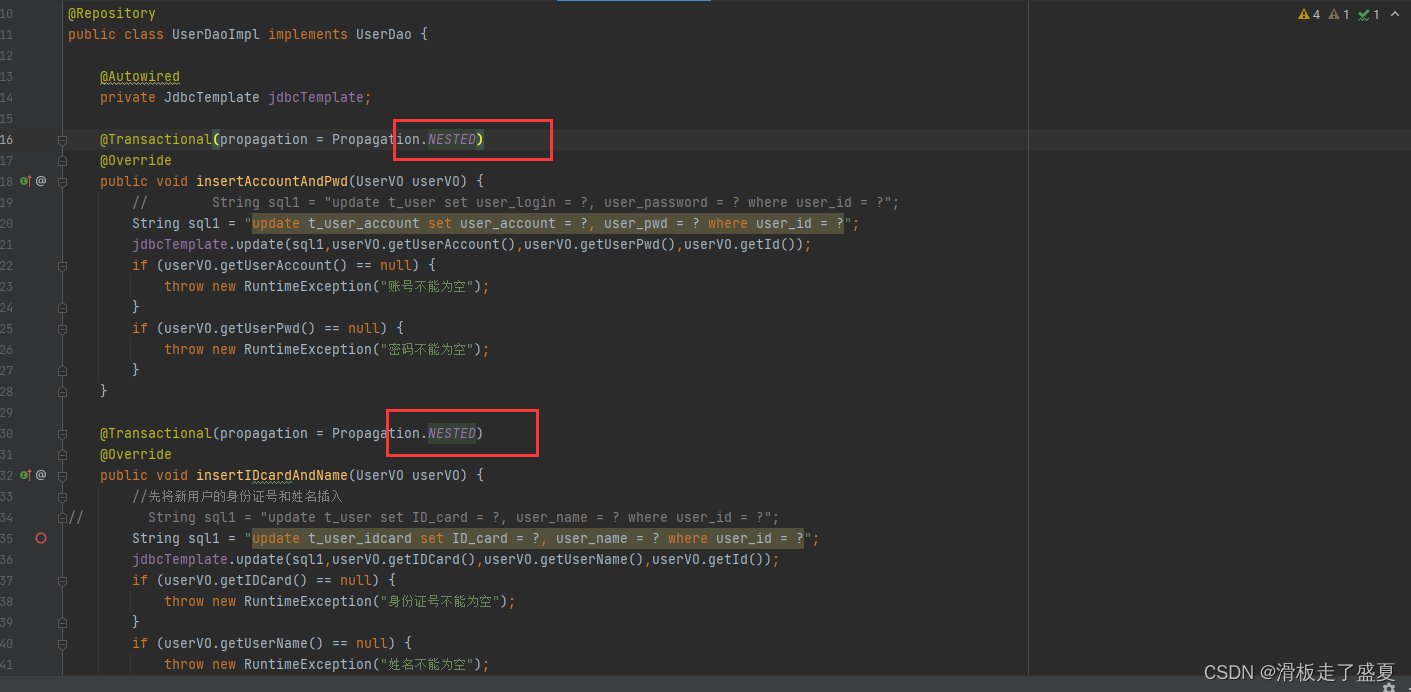
@Transactional(propagation = Propagation.REQUIRED)
@Override
public void insertIDcardAndName(UserVO userVO) {
String sql1 = "update t_user_idcard set ID_card = ?, user_name = ? where user_id = ?";
jdbcTemplate.update(sql1,userVO.getIDCard(),userVO.getUserName(),userVO.getId());
if (userVO.getIDCard() == null) {
throw new RuntimeException("身份证号不能为空");
}
if (userVO.getUserName() == null) {
throw new RuntimeException("姓名不能为空");
}
}
}
|
测试
1
2
3
4
5
6
7
8
9
10
11
12
13
14
15
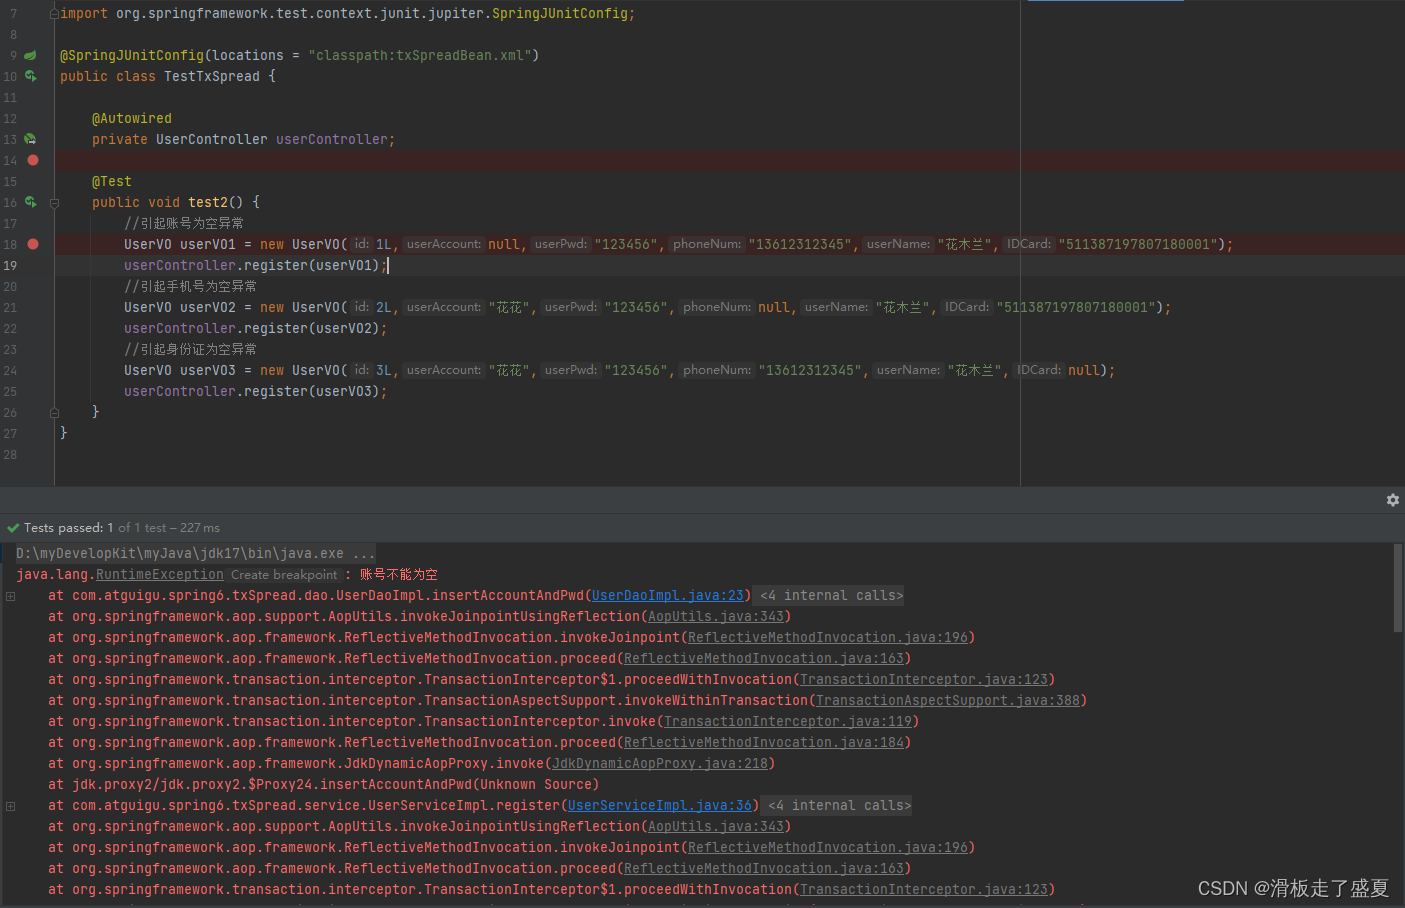
| @SpringJUnitConfig(locations = "classpath:txSpreadBean.xml")
public class TestTxSpread {
@Autowired
private UserController userController;
@Test
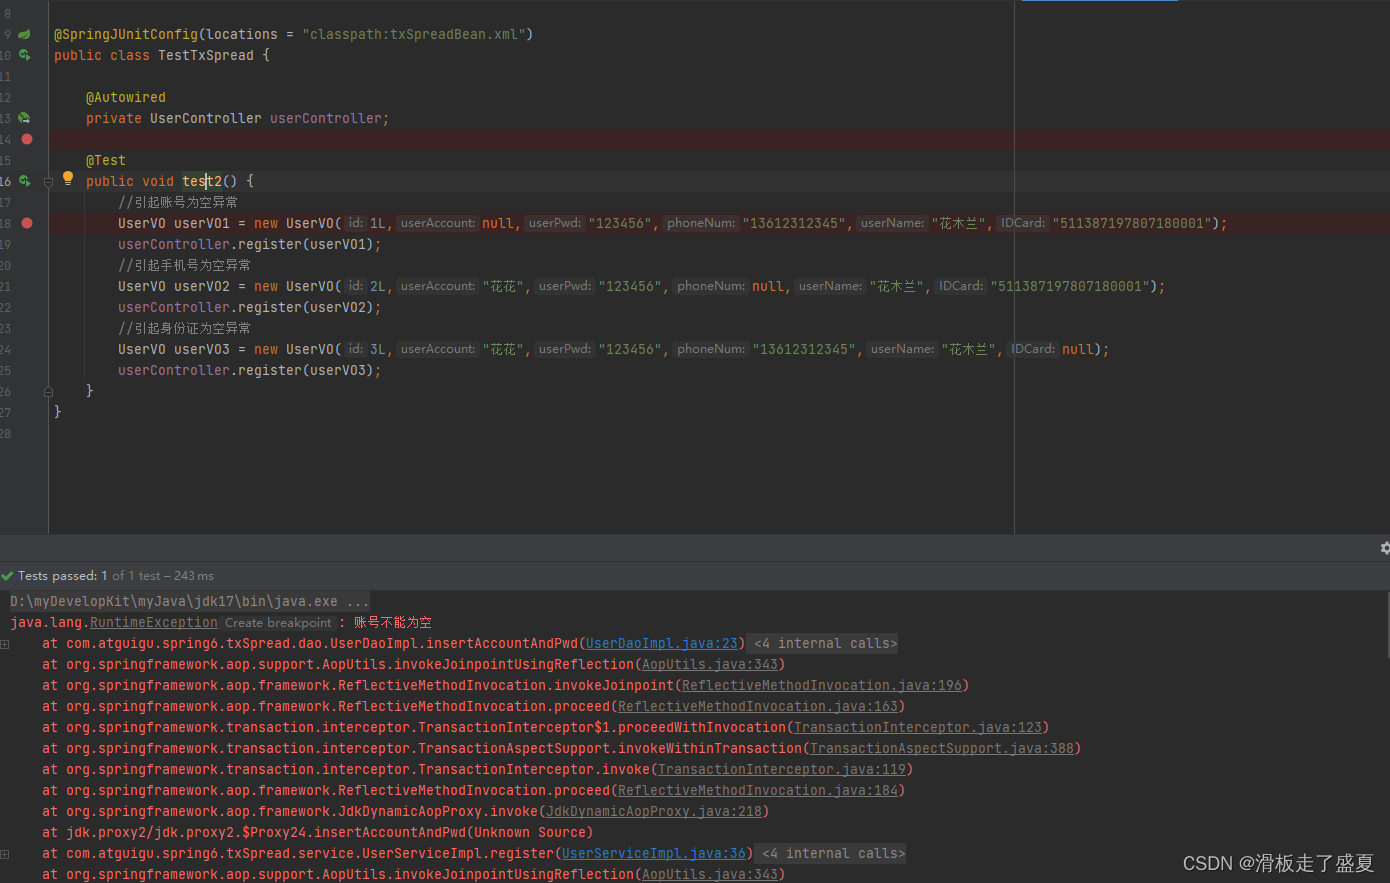
public void test2() {
UserVO userVO1 = new UserVO(1L,"花花","123456",null,"花木兰","511387197807180001");
userController.register(userVO1);
UserVO userVO2 = new UserVO(2L,"花花","123456","13612312345","花木兰",null);
userController.register(userVO2);
}
}
|
在该示例中涉及事务传播行为要点的是UserServiceImpl的register方法。
register方法:是外围方法,除了调用了insertAccountAndPwd方法和insertIDcardAndName方法外,直接调用jdbcTemplate进行手机号的插入。
insertAccountAndPwd方法:是内围方法,进行账号密码的插入。
insertIDcardAndName方法:是内围方法,进行身份证号、姓名的插入。
场景1
我们要实现登录账号、密码、手机号、身份证号、姓名,这些都不能为空,如果其中一个发生异常,那么其余已经插入的全部回滚。
根据这个业务及我们当前代码结构,我们需要在这一个外围方法和两个内围方法中都添加@Transactional注解,因为要求有异常,只要有数据库改动的代码全部回滚。
传播行为选择
将@Transactional的事务传播属性propagation值设为Propagation.REQUIRED
这个值是默认的,它的含义是:如果当前没有事务,就新建一个事务,如果已经存在一个事务中,加入到这个事务中。
这正好符合我们业务需求:外围方法已经是一个事务后,被调用的两个内围方法也加入到这个事务中,就实现了只要有任意一个异常,只会插入一个id,其余需要插入的登录账号、密码、手机号、身份证号、姓名都回滚。
测试:
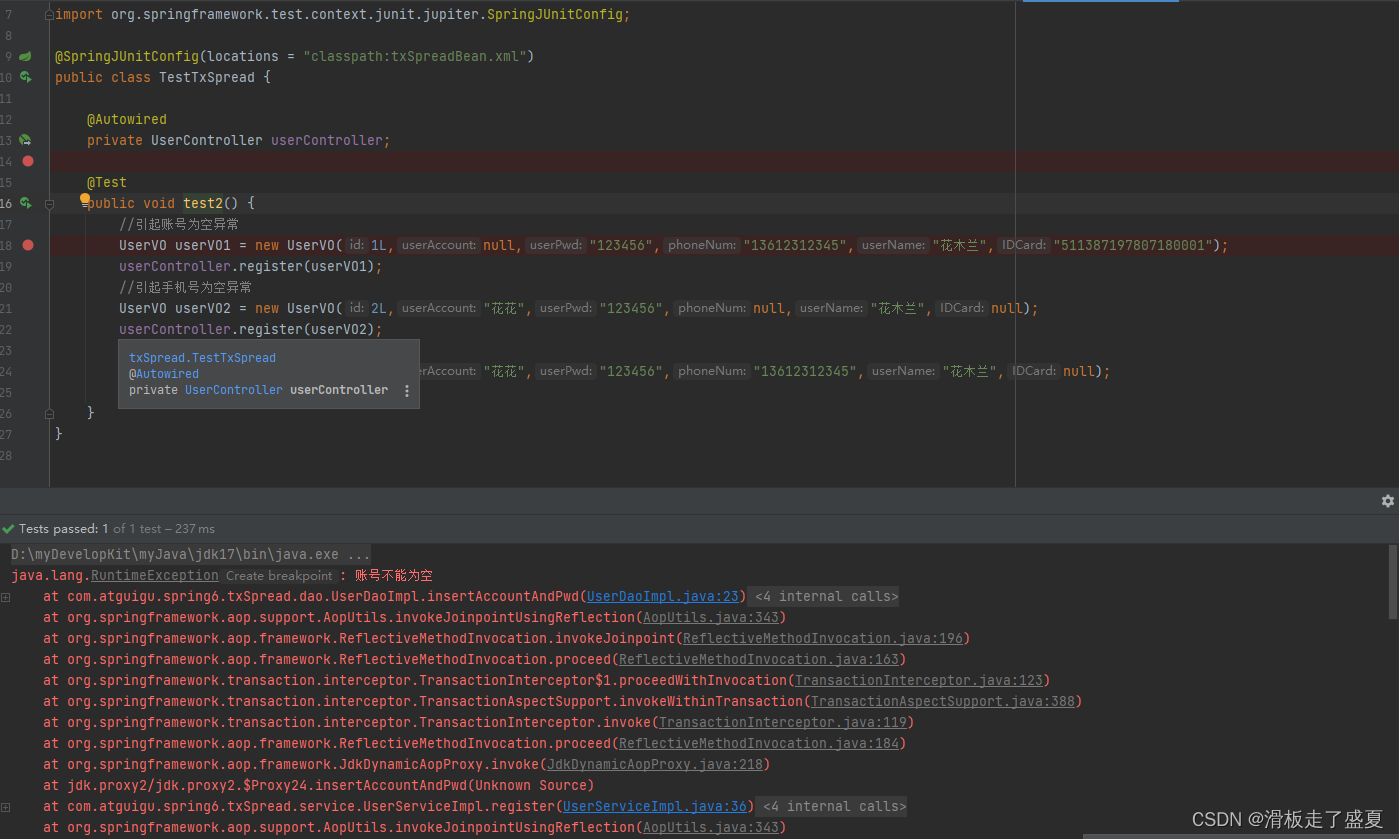
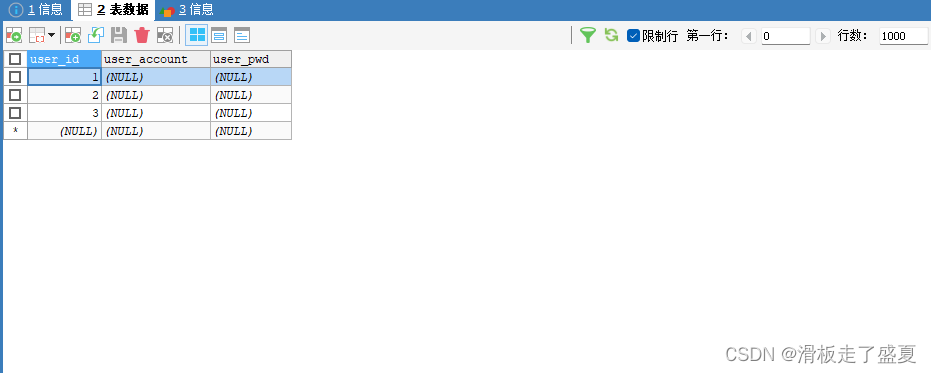
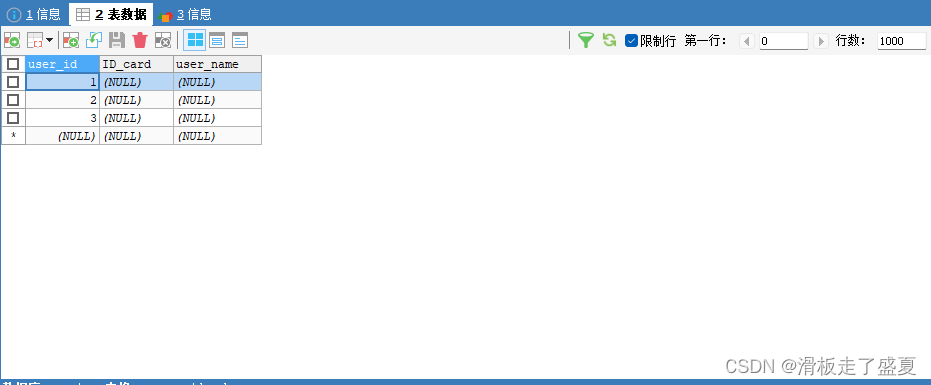
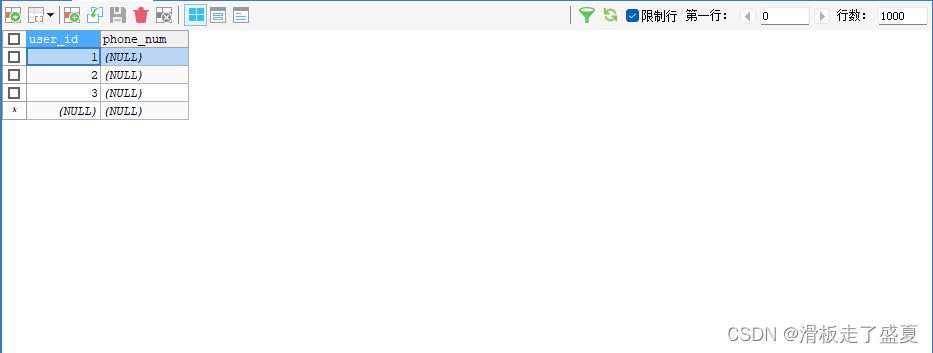
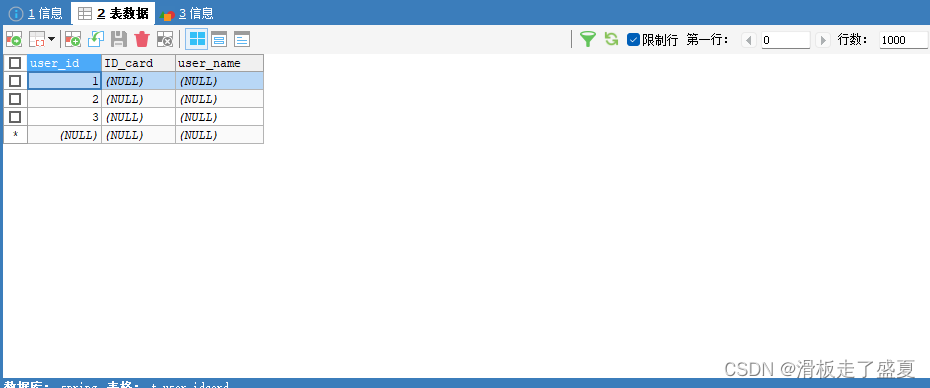
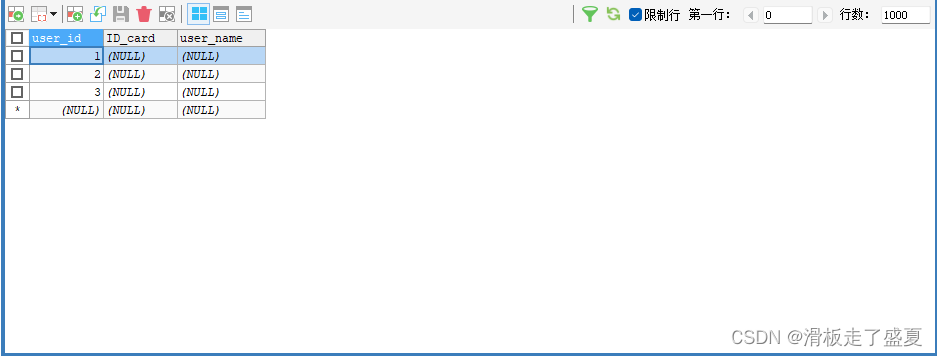
可以看见:只要一个方法内有异常,这三个方法都会回滚,数据库里没有一个表中有新记录。
场景2
业务逻辑改为注册时可以不提交身份证号与姓名(但是身份证号和姓名必须同时添加或不添加),后续确定后再提交即可,账号密码和手机号仍然不可缺少,少一个则全部回滚。
那么这里我们仍保持内围方法insertIDcardAndName方法为事务,外围方法register和内围方法insertAccountAndPwd也为事务,但是要保证insertIDcardAndName方法出现异常时不能导致外围方法回滚。
导致外围回滚有两种途径,一个是内围方法出现异常后会抛出给外围方法,然后外围方法的@Transactional感知到异常回滚,另一个是外围方法与内围方法本事是一个事务,那么内围方法回滚的时候自然会使外围方法也会滚。
传播行为选择
首先要在外围方法中将内围方法insertIDcardAndName的异常捕获,不能再使用REQUIRED为事务传播属性了,因为内围方法事务传播属性为REQUIRED代表加入到外围方法的事务中,会同时回滚。将@Transactional的事务传播属性propagation值设为Propagation.NESTED,它的含义是:如果当前存在事务,则在嵌套事务内执行。如果当前没有事务,就新建一个事务。这正好符合我们业务需求:外围方法是一个事务的情况下,我们的内围方法有异常只需要回滚自己就行,外围方法有异常才回滚全部。
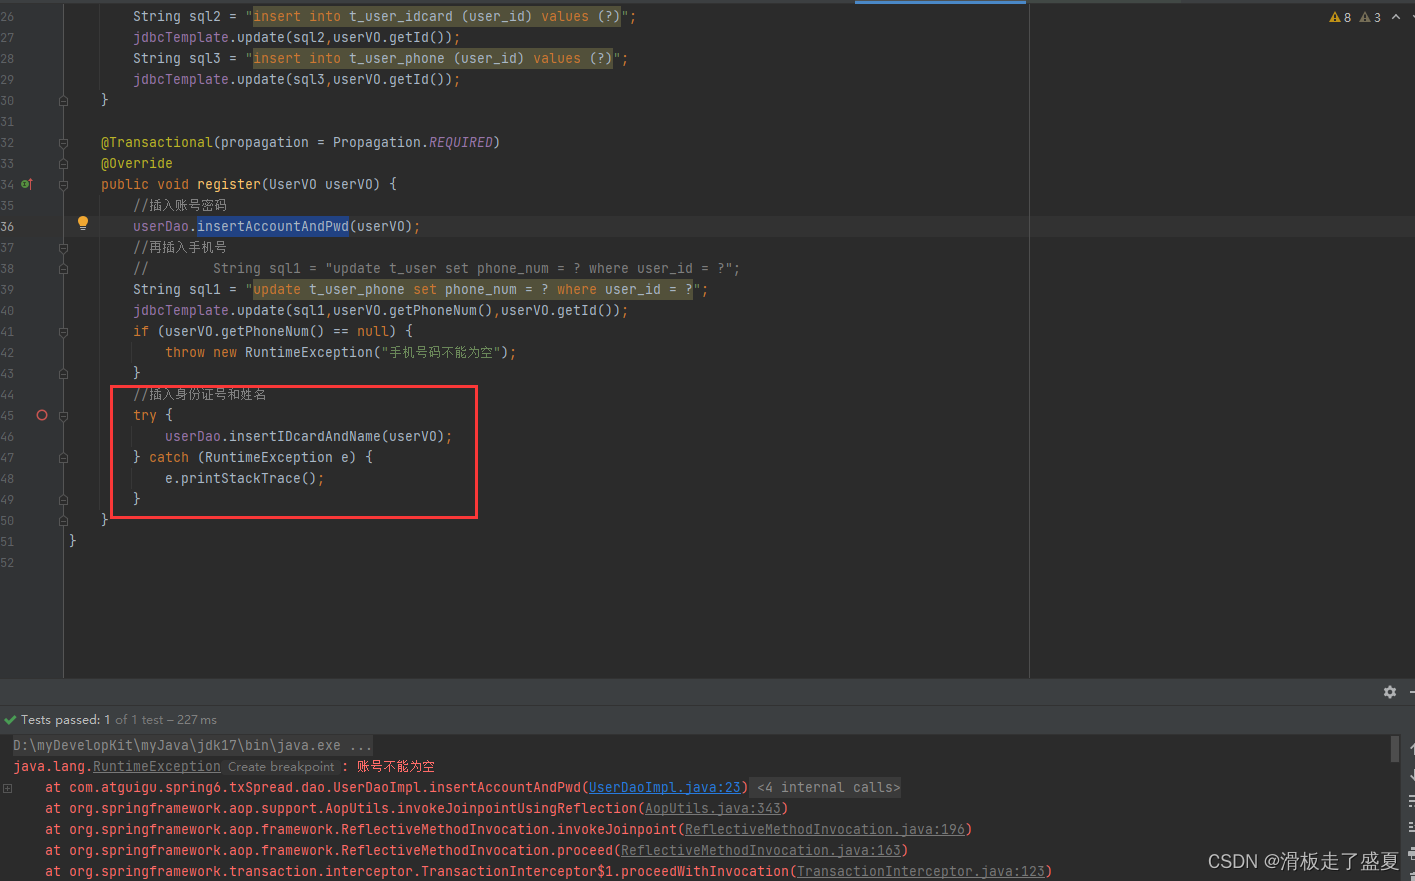
测试:
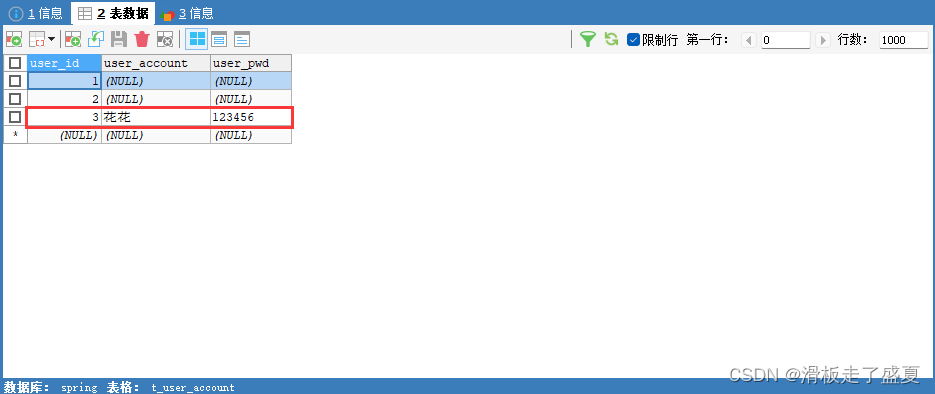
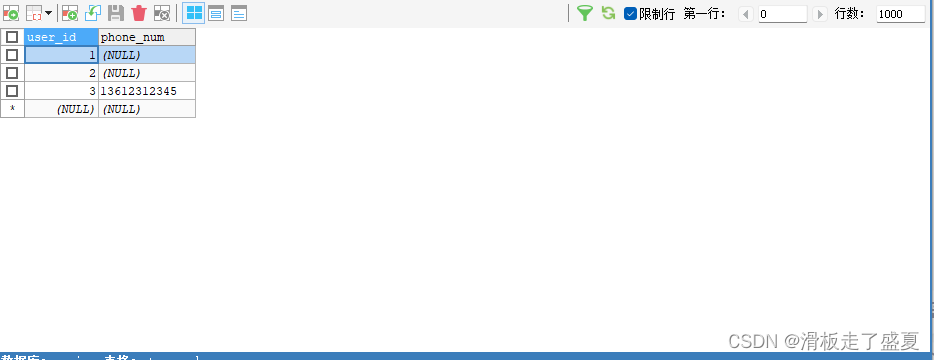
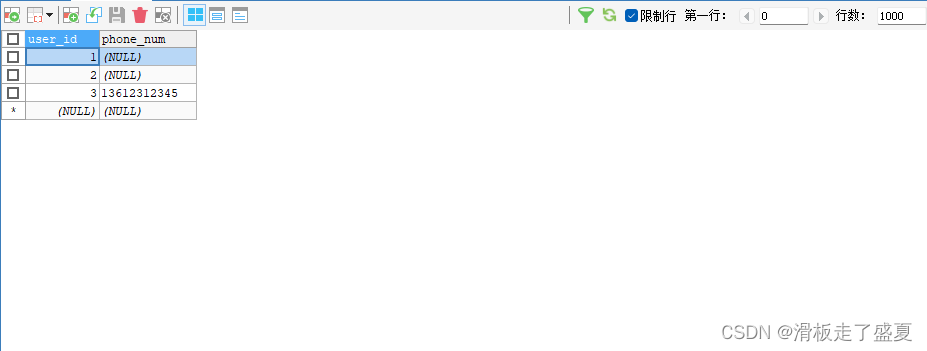
上边我们通过引起这三个方法(一个外围、两个内围)内的异常,发现当insertIDcardAndName方法有异常,并不会导致外围方法register和内围方法insertAccountAndPwd回滚。
场景3
注册时可以不提交身份证号与姓名(但是身份证号和姓名必须同时添加或不添加),也可以不提交手机号,后续确定后再提交即可,账号密码和手机号仍然不可缺少,少一个则全部回滚。
传播行为选择
上次业务修改我们只要保证内围方法insertIDcardAndName回滚不带上外围方法回滚,这次我们还要保证外围方法register回滚时不要带上内围方法insertAccountAndPwd回滚。
所以这次我们可以将@Transactional的事务传播属性propagation值设为Propagation.REQUIRES_NEW,它的含义是:如果当前没有事务,就新建一个事务。如果当前存在事务,把当前事务挂起,并且自己创建一个新的事务给自己使用。
这正好符合我们业务需求:外围方法是一个事务的情况下,我们的内围方法开始它自己的业务,外围方法回滚不带上内围方法。
测试
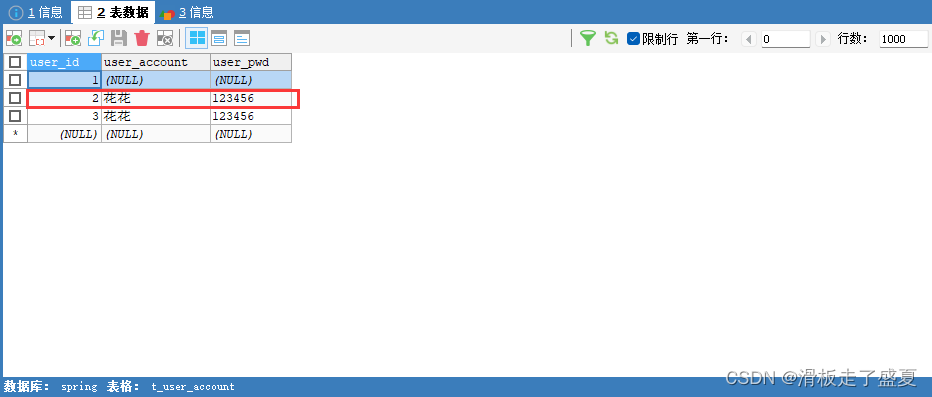
上边我们通过引起这三个方法(一个外围、两个内围)内的异常,发现当外围方法register方法有异常,并不会导致内围方法insertAccountAndPwd回滚。
总结
当我们不想让内围回滚带上外围也回滚,内围方法事务就不要使用REQUIRED,可以使用NESTED或REQUIRES_NEW。
当我们不想让外围回滚带上内围也回滚,内围方法事务就不要使用REQUIRED和NESTED,可以使用REQUIRES_NEW。