面试-常见设计模式

只是书写自己熟悉或使用到的设计模式

1. 创建型

1.1 单例模式

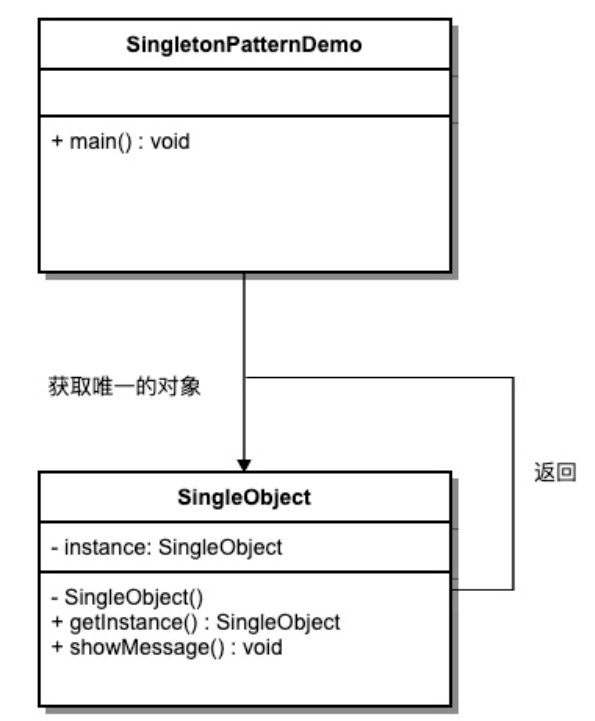
  • 确保一个类只有一个实例,而且自行实例化并向整个系统提供这个实例。

1.1.1 类图

单例模式类图

1.1.2 代码

1
2
3
4
5
6
7
8
9
10
11
12
13
14
15
16
/**
* 静态变量创建类的对象
*/
public class Singleton {
// 私有构造方法
private Singleton() {
}

// 在成员位置创建该类的对象
private static Singleton instance = new Singleton();

// 对外提供静态方法获取该对象
public static Singleton getInstance() {
return instance;
}
}
1
2
3
4
5
6
7
8
9
10
11
12
13
14
15
16
17
18
19
20
/**
* 在静态代码块中创建该类对象
*/
public class Singleton {
// 私有构造方法
private Singleton() {
}

// 在成员位置创建该类的对象
private static Singleton instance;

static {
instance = new Singleton();
}

// 对外提供静态方法获取该对象
public static Singleton getInstance() {
return instance;
}
}
1
2
3
4
5
6
7
8
9
10
11
12
13
14
15
16
17
18
19
20
21
22
23
24
/**
* 双重检查方式
*/
public class Singleton {
// 私有构造方法
private Singleton() {
}

private static volatile Singleton instance; //加入volatile的目的:避免重排序

// 对外提供静态方法获取该对象
public static Singleton getInstance() {
// 第一次判断,如果instance不为null,不进入抢锁阶段,直接返回实例
if (instance == null) {
synchronized (Singleton.class) {
// 抢到锁之后再次判断是否为null
if (instance == null) {
instance = new Singleton();
}
}
}
return instance;
}
}
1
2
3
4
5
6
7
8
9
10
11
12
13
14
public class Singleton {
// 私有构造方法
private Singleton() {
}

private static class SingletonHolder {
private static final Singleton INSTANCE = new Singleton();
}

// 对外提供静态方法获取该对象
public static Singleton getInstance() {
return SingletonHolder.INSTANCE;
}
}

1.2 简单工厂模式

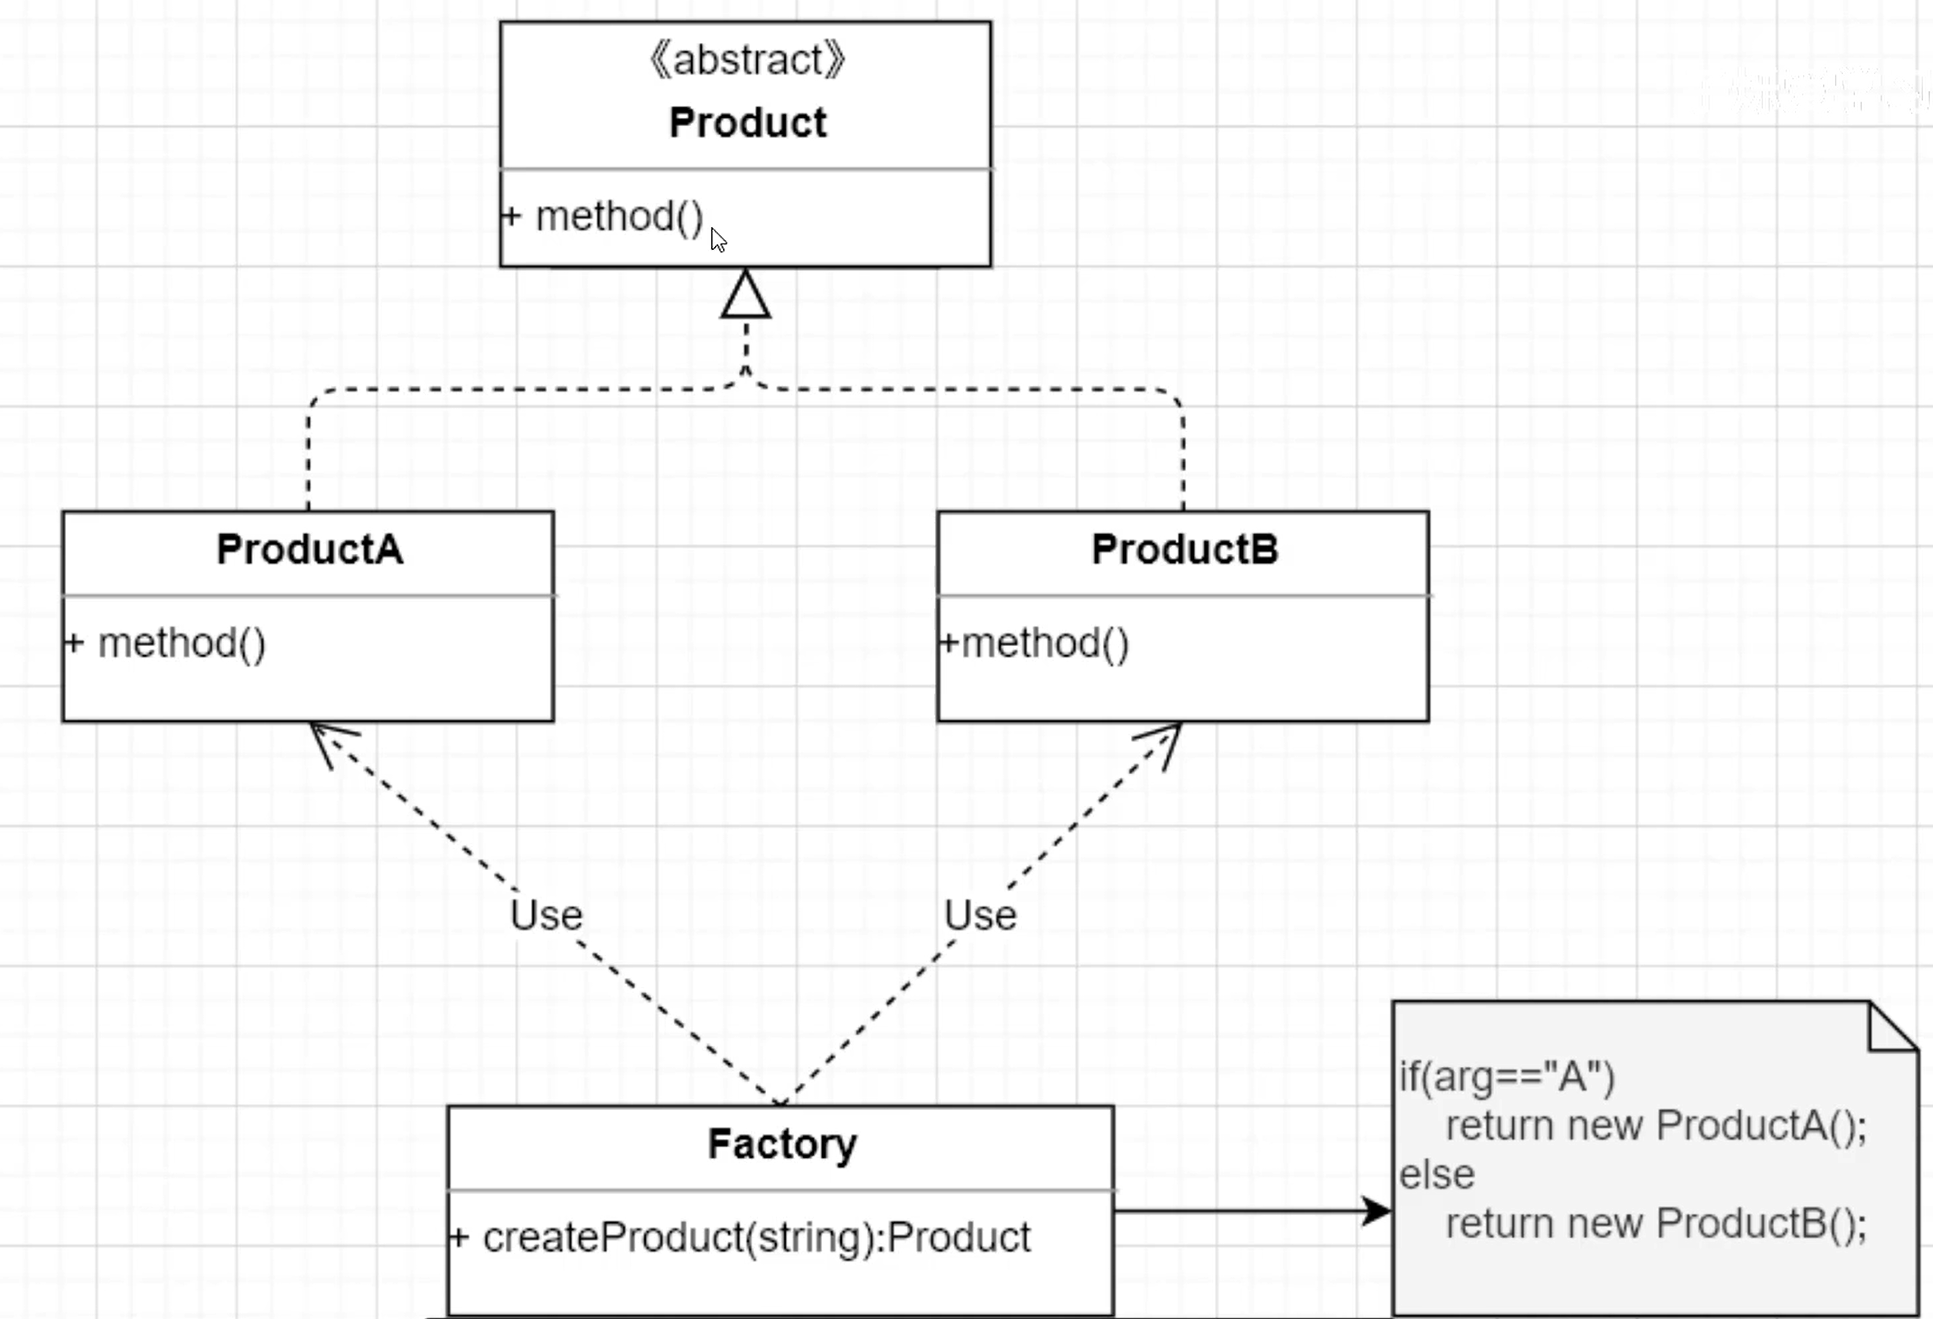
  • 在该模式中,可以根据参数的不同从而返回不同类的实例。
  • 优点:
    • 实现了对象的创建和使用分离。
    • 创建交给专门的工厂类负责,程序员不需要关心如何去创建的,直接使用即可。
  • 缺点:
    • 不够灵活,如果新增一个产品就需要去修改工厂类。

1.2.1 类图

简单工厂类图

1.2.2 代码

1
2
3
4
// 抽象父类定义行为
abstract class Product{
public abstract void print();
}
1
2
3
4
5
6
7
8
// 子类实现
class ProductA extends Product{

@Override
public void print() {
System.out.println("产品A");
}
}
1
2
3
4
5
6
7
8
// 子类实现
class ProductB extends Product{

@Override
public void print() {
System.out.println("产品B");
}
}
1
2
3
4
5
6
7
8
9
10
11
12
13
14
15
// client
public class SimpleFactory {
public static void main(String[] args) {
Product product = SimpleFactory.createProduct("A");
product.print();
}

public static Product createProduct(String type) {
if ("A".equals(type)){
return new ProductA();
}else {
return new ProductB();
}
}
}

1.3 工厂模式

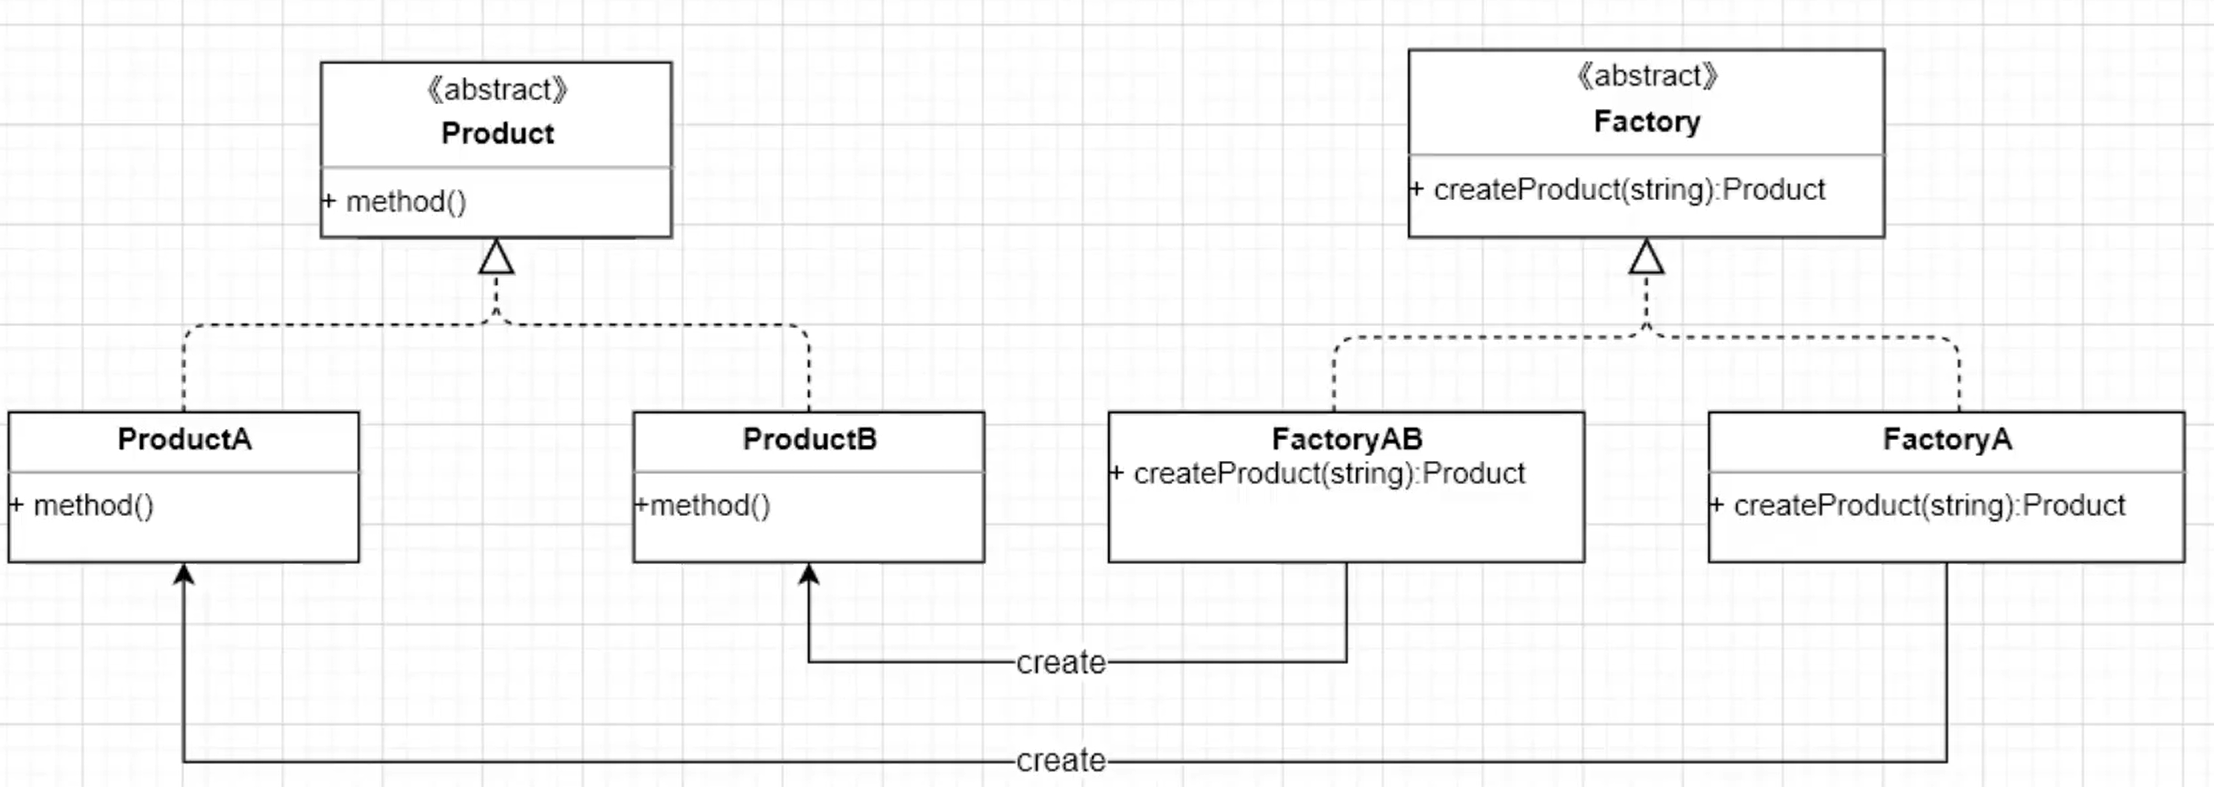
  • 定义一个用于创建对象的接口,让子类决定实例化哪个类。工厂方法使一个类的实例化延迟到其子类。

1.3.1 类图

工厂模式类图

1.3.2 代码

1
2
3
4
// 定义工厂接口
interface Factory{
PhoneProduct createPhone();
}
1
2
3
4
// 定义产品接口
interface PhoneProduct{
void print();
}
1
2
3
4
5
6
7
8
9
10
11
12
13
14
15
16
17
// 子类实现产品
class IPhone implements PhoneProduct{

@Override
public void print() {
System.out.println("iphone");
}
}

// 子类实现产品
class HUAWEIPhone implements PhoneProduct{

@Override
public void print() {
System.out.println("HUAWEI");
}
}
1
2
3
4
5
6
7
8
9
10
11
12
13
14
15
16
17
// 子类实现工厂
class IPhoneFactory implements Factory{

@Override
public PhoneProduct createPhone() {
return new IPhone();
}
}

// 子类实现工厂
class HUAWEIFactory implements Factory{

@Override
public PhoneProduct createPhone() {
return new HUAWEIPhone();
}
}
1
2
3
4
5
6
7
8
// client
public class FactoryPattern {
public static void main(String[] args) {
Factory iPhoneFactory = new IPhoneFactory();
PhoneProduct iPhone = iPhoneFactory.createPhone();
iPhone.print();
}
}

1.4 建造者模式

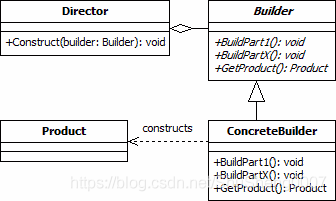
  • 使用多个简单的对象一步步构建一个复杂的对象(当一个类的构造参数超过4个,并且这里面的参数有些是可选,可以考两次使用创建者模式)。

1.4.1 类图

建造者模式类图

1.4.2 代码

1
2
3
4
5
6
7
8
9
10
11
12
13
14
15
16
17
18
19
20
21
22
23
24
25
26
27
28
29
30
31
32
33
34
35
36
37
38
39
40
41
42
43
44
45
46
47
48
49
50
51
52
53
54
55
56
57
58
59
60
61
62
63
64
65
66
67
68
69
70
71
72
73
74
75
// 具体类
class Computer {
private final String cpu;//必须
private final String ram;//必须
private final int usbCount;//可选
private final String keyboard;//可选
private final String display;//可选

public Computer(Builder builder) {
this.cpu = builder.cpu;
this.ram = builder.ram;
this.usbCount = builder.usbCount;
this.keyboard = builder.keyboard;
this.display = builder.display;
}

public String getCpu() {
return cpu;
}

public String getRam() {
return ram;
}

public int getUsbCount() {
return usbCount;
}

public String getKeyboard() {
return keyboard;
}

public String getDisplay() {
return display;
}

@Override
public String toString() {
return "com.lixiang.Computer{" +
"cpu='" + cpu + '\'' +
", ram='" + ram + '\'' +
", usbCount=" + usbCount +
", keyboard='" + keyboard + '\'' +
", display='" + display + '\'' +
'}';
}

static class Builder {
private final String cpu;//必须
private final String ram;//必须
private int usbCount;//可选
private String keyboard;//可选
private String display;//可选
public Builder(String cpu, String ram) {
this.cpu = cpu;
this.ram = ram;
}

public Builder setUsbCount(int usbCount) {
this.usbCount = usbCount;
return this;
}
public Builder setKeyboard(String keyboard) {
this.keyboard = keyboard;
return this;
}
public Builder setDisplay(String display) {
this.display = display;
return this;
}
public Computer build() {
return new Computer(this);
}
}
}
1
2
3
4
5
6
7
8
9
10
11
// client
public class BuilderPattern {
public static void main(String[] args) {
Computer computer = new Computer.Builder("inter", "sansung")
.setDisplay("xiaomi")
.setKeyboard("luoji")
.setUsbCount(2)
.build();
System.out.println(computer.toString());
}
}

2. 行为型

2.1 策略模式

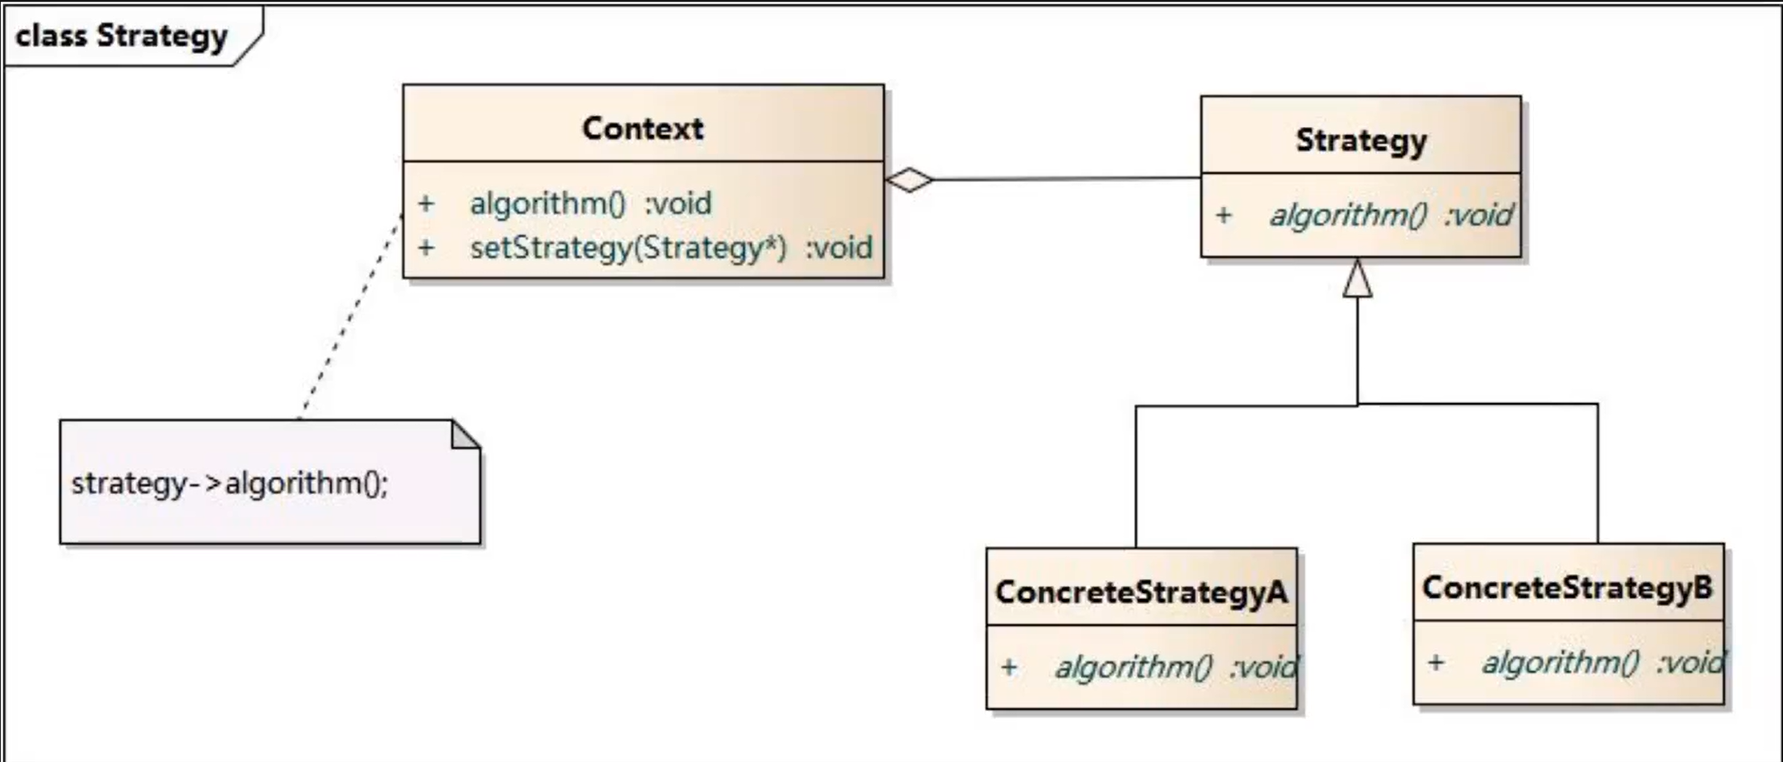
  • 定义一组算法,将每个算法都封装起来,并且使他们之间可以互相转换。策略模式让算法独立于使用它的客户而变化。

2.1.1 类图

策略模式类图

2.1.2 代码

1
2
3
4
// 定义策略
interface Strategy {
void wash();
}
1
2
3
4
5
6
7
8
9
10
11
12
13
14
15
16
17
18
19
20
21
22
23
24
25
26
// 具体执行的动作
class normal implements Strategy {

@Override
public void wash() {
System.out.println("正常洗衣服");
}
}


class Piaoxi implements Strategy {

@Override
public void wash() {
System.out.println("漂洗衣物");
}
}


class Shuaigan implements Strategy {

@Override
public void wash() {
System.out.println("甩干衣物");
}
}
1
2
3
4
5
6
7
8
9
10
11
// 需要根据策略动态选择的类
class Xiyiji {
private Strategy strategy;

public Xiyiji(Strategy strategy) {
this.strategy = strategy;
}
public void execute() {
strategy.wash();
}
}
1
2
3
4
5
6
7
// client
public class StrategyPattern {
public static void main(String[] args) {
Xiyiji xiyiji = new Xiyiji(new normal());
xiyiji.execute();
}
}

2.2 观察者模式

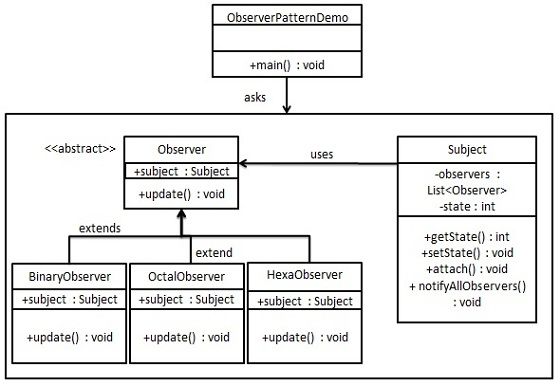
  • 对象间一种一对多依赖关系,使得每当一个对象状态发生改变的时候,其相关依赖的对象都能都通知并被自动更新。

2.2.1 类图

观察者模式类图

2.2.2 代码

1
2
3
4
5
6
7
8
// 定义待观察接口
interface Debit {
//找人借钱
void borrow(Credit credit);

void notifyRepay(int money);

}
1
2
3
4
5
6
7
8
9
10
11
12
13
// 定义待观察者
class Zhangsan implements Debit {
private List<Credit> allCredits = new ArrayList<>();
@Override
public void borrow(Credit credit) {
allCredits.add(credit);
}

@Override
public void notifyRepay(int money) {
allCredits.forEach(credit -> credit.takeMoney());
}
}
1
2
3
4
// 定义观察者接口
interface Credit {
void takeMoney();
}
1
2
3
4
5
6
7
8
9
10
11
12
13
14
15
16
// 定义观察者
class Lisi implements Credit {

@Override
public void takeMoney() {
System.out.println("李四要钱");
}
}

class Wangwu implements Credit {

@Override
public void takeMoney() {
System.out.println("王五要钱");
}
}
1
2
3
4
5
6
7
8
9
10
11
// client
public class ObserverPattern {
public static void main(String[] args) {
Debit zhangsan = new Zhangsan();
zhangsan.borrow(new Wangwu());
zhangsan.borrow(new Lisi());

//当张三有钱的时候就通知借钱的自己有钱,可以开始还钱了
zhangsan.notifyRepay(1);
}
}

2.3 责任链模式

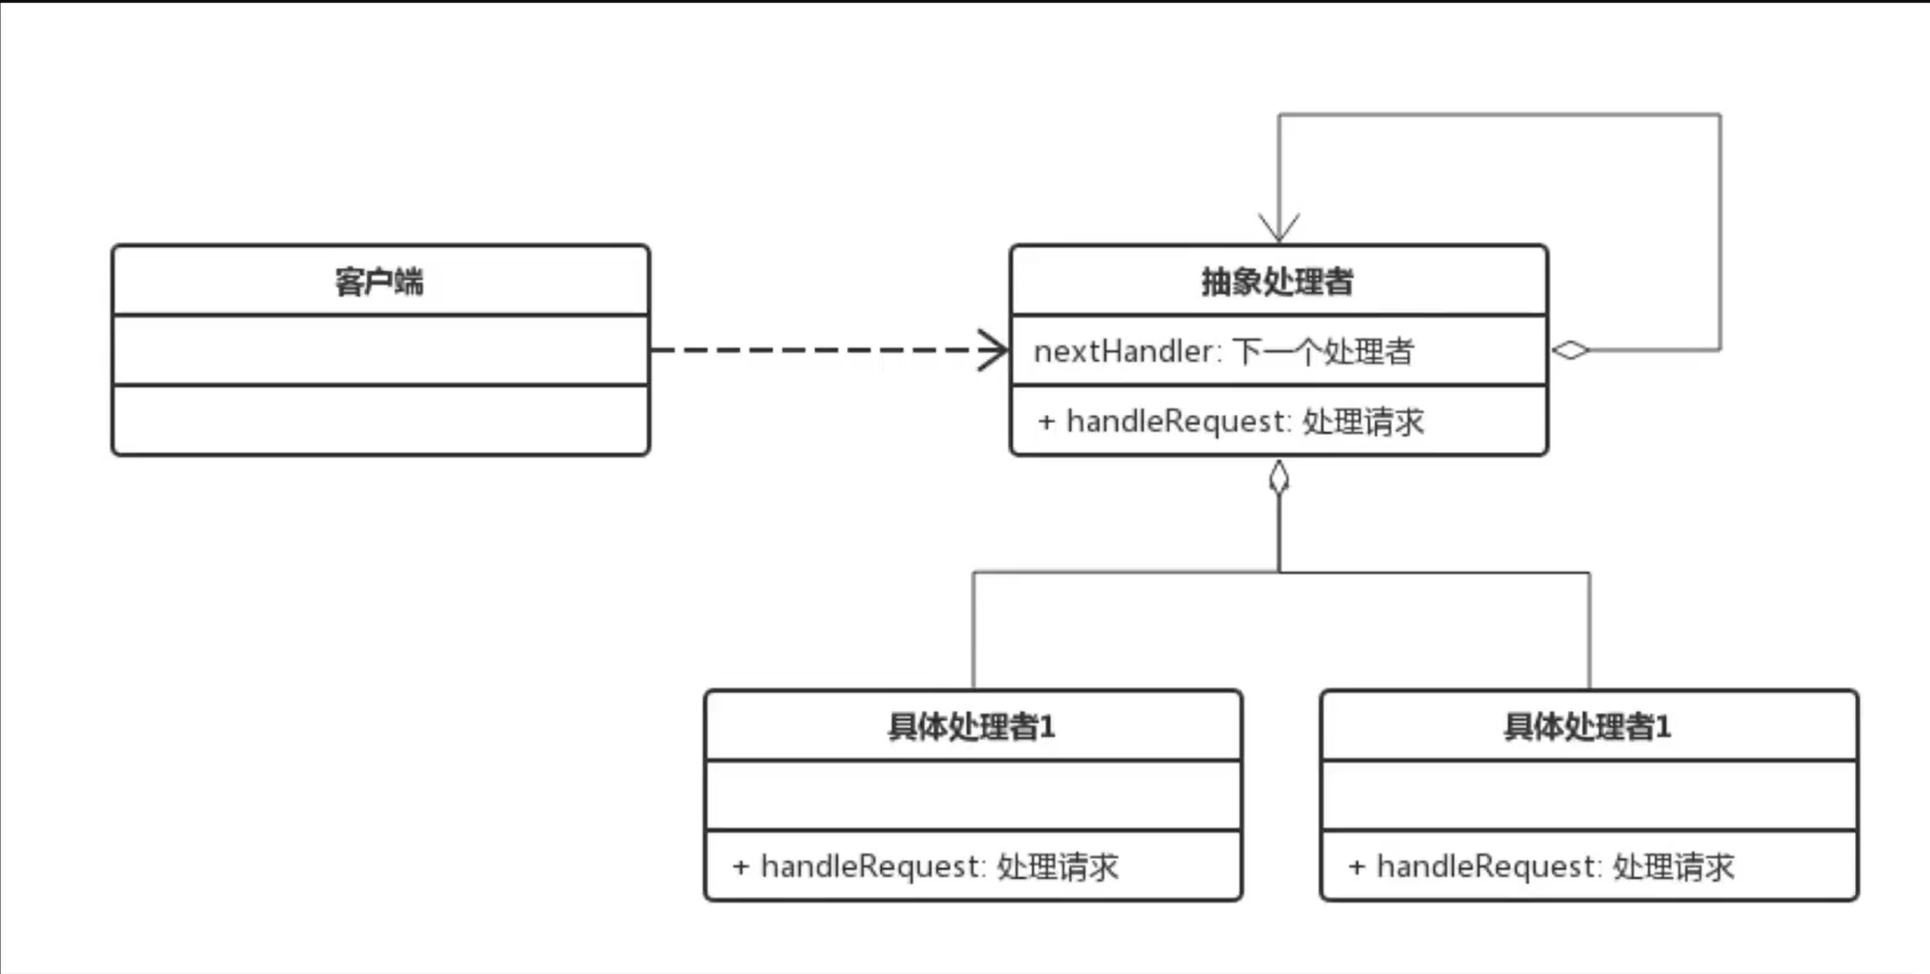
  • 责任链模式是一种请求的模式,让多个处理器都有机会处理该请求,直到其中某个处理器成功位置。责任链模式把多个处理器串成链,然后让请求在链上传递。

2.3.1 类图

责任链模式类图

2.3.2 代码

1
2
3
4
5
6
7
8
9
// 定义链条接口
abstract class Handler {
protected Handler nextHandler;
public void setNextHandler(Handler nextHandler) {
this.nextHandler = nextHandler;
}

public abstract void process(Integer info);
}
1
2
3
4
5
6
7
8
9
10
11
12
13
14
15
16
17
18
19
20
21
22
23
24
25
26
27
28
29
30
31
32
33
34
35
36
37
38
39
40
// 具体链条上的点
/**
* 四川只能提供1-10级别的风景
*/
class Sichuan extends Handler {
@Override
public void process(Integer info) {
if (info > 0 && info < 11) {
System.out.println("欢迎来到四川");
} else {
nextHandler.process(info);
}
}
}

/**
* 甘肃只能提供11~20级别的风景
*/

class Gansu extends Handler {

@Override
public void process(Integer info) {
if (info > 10 && info < 21) {
System.out.println("欢迎来到甘肃");
}
}
}

/**
* 因为西藏是所有旅途的最终点,那么最终在西藏结束旅途
*/
class Xizang extends Handler {

@Override
public void process(Integer info) {
System.out.println("欢迎来到西藏");
System.out.println("整个旅途结束");
}
}
1
2
3
4
5
6
7
8
9
10
11
12
13
14
15
// client
public class ChainResPattern {
public static void main(String[] args) {
Handler sichuan = new Sichuan();
Handler gansu = new Gansu();
Handler xizang = new Xizang();

sichuan.setNextHandler(gansu);
gansu.setNextHandler(xizang);

sichuan.process(10);
gansu.process(11);
xizang.process(21);
}
}

3. 结构型

3.1 代理模式

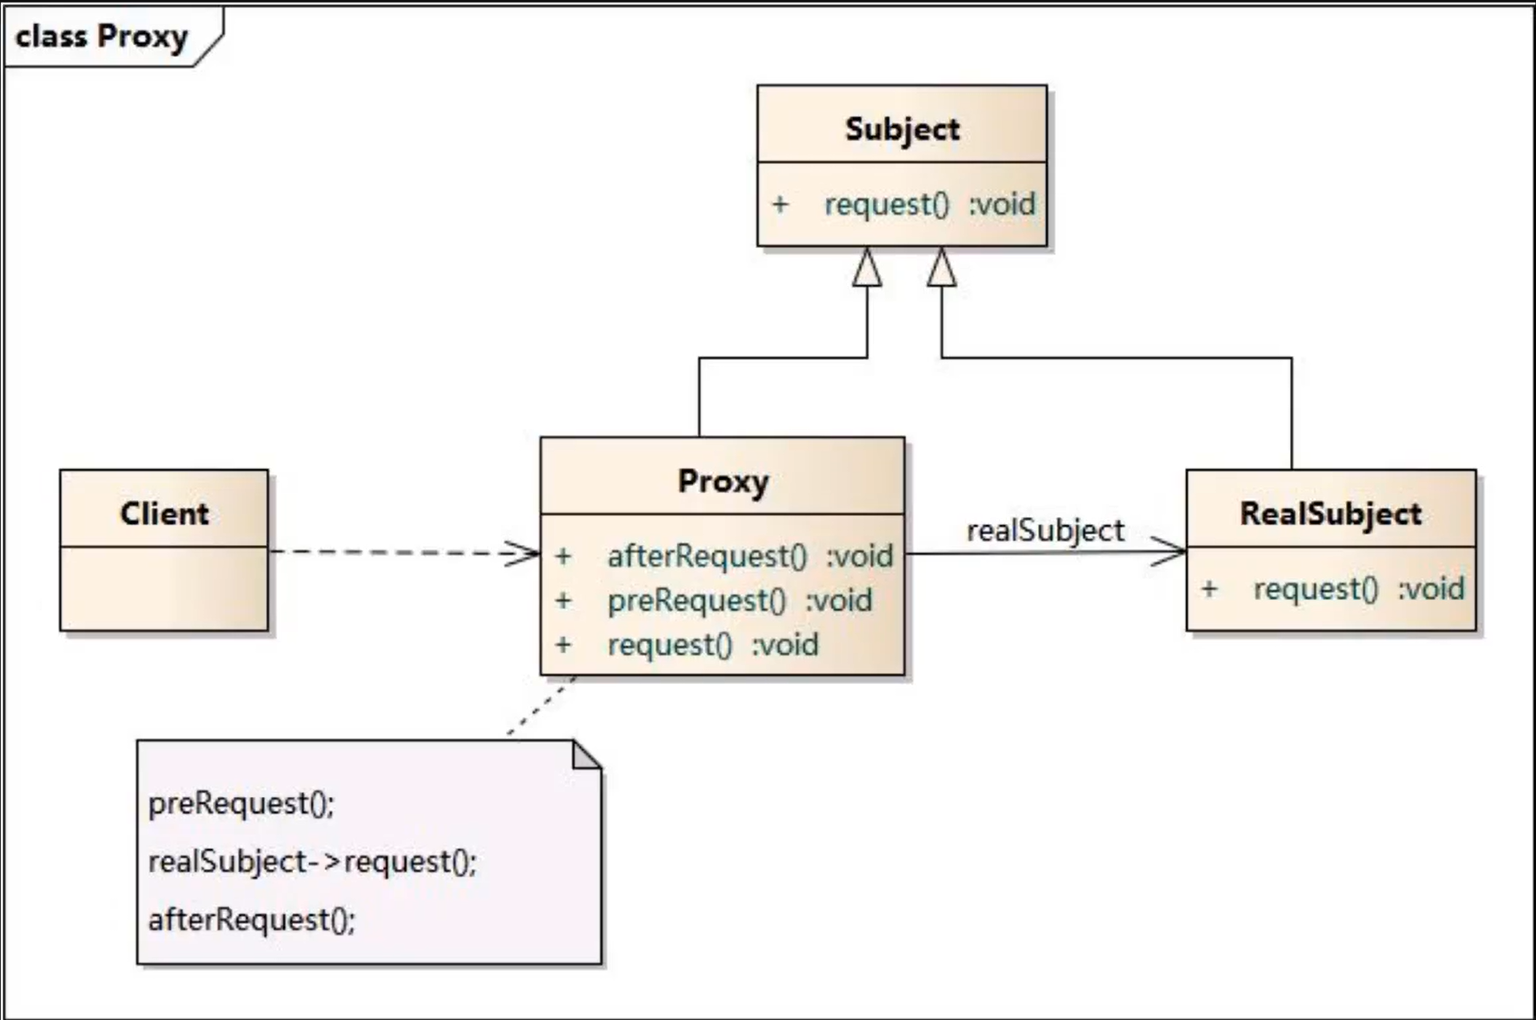
  • 为其他对象提供一种代理以控制对这个对象的访问

3.1.1 类图

代理模式类图

3.1.2 代码

1
2
3
4
// 定义接口
interface Subject {
void doWork();
}
1
2
3
4
5
6
7
8
// 具体实现子类
class RealSubject implements Subject {

@Override
public void doWork() {
System.out.println("我是房东");
}
}
1
2
3
4
5
6
7
8
9
10
11
12
13
14
15
16
17
18
19
20
21
22
23
24
25
26
27
28
29
30
31
32
33
// 针对具体子类的代理类
class RealSubjectProxy implements Subject {
private RealSubject realSubject;

public RealSubjectProxy() {
try {
// 核心
this.realSubject = (RealSubject) this.getClass().getClassLoader().loadClass("xxx.RealSubject").newInstance();
} catch (Exception e) {

}
}

@Override
public void doWork() {
findHouseOwner();
demand();
realSubject.doWork();
rent();
}

public void findHouseOwner() {
System.out.println("找房东");
}

public void demand() {
System.out.println("这是用户的需求");
}

public void rent() {
System.out.println("这是房租");
}
}
1
2
3
4
5
6
// client
public class ProxyPattern {
public static void main(String[] args) {
new RealSubjectProxy().doWork();
}
}

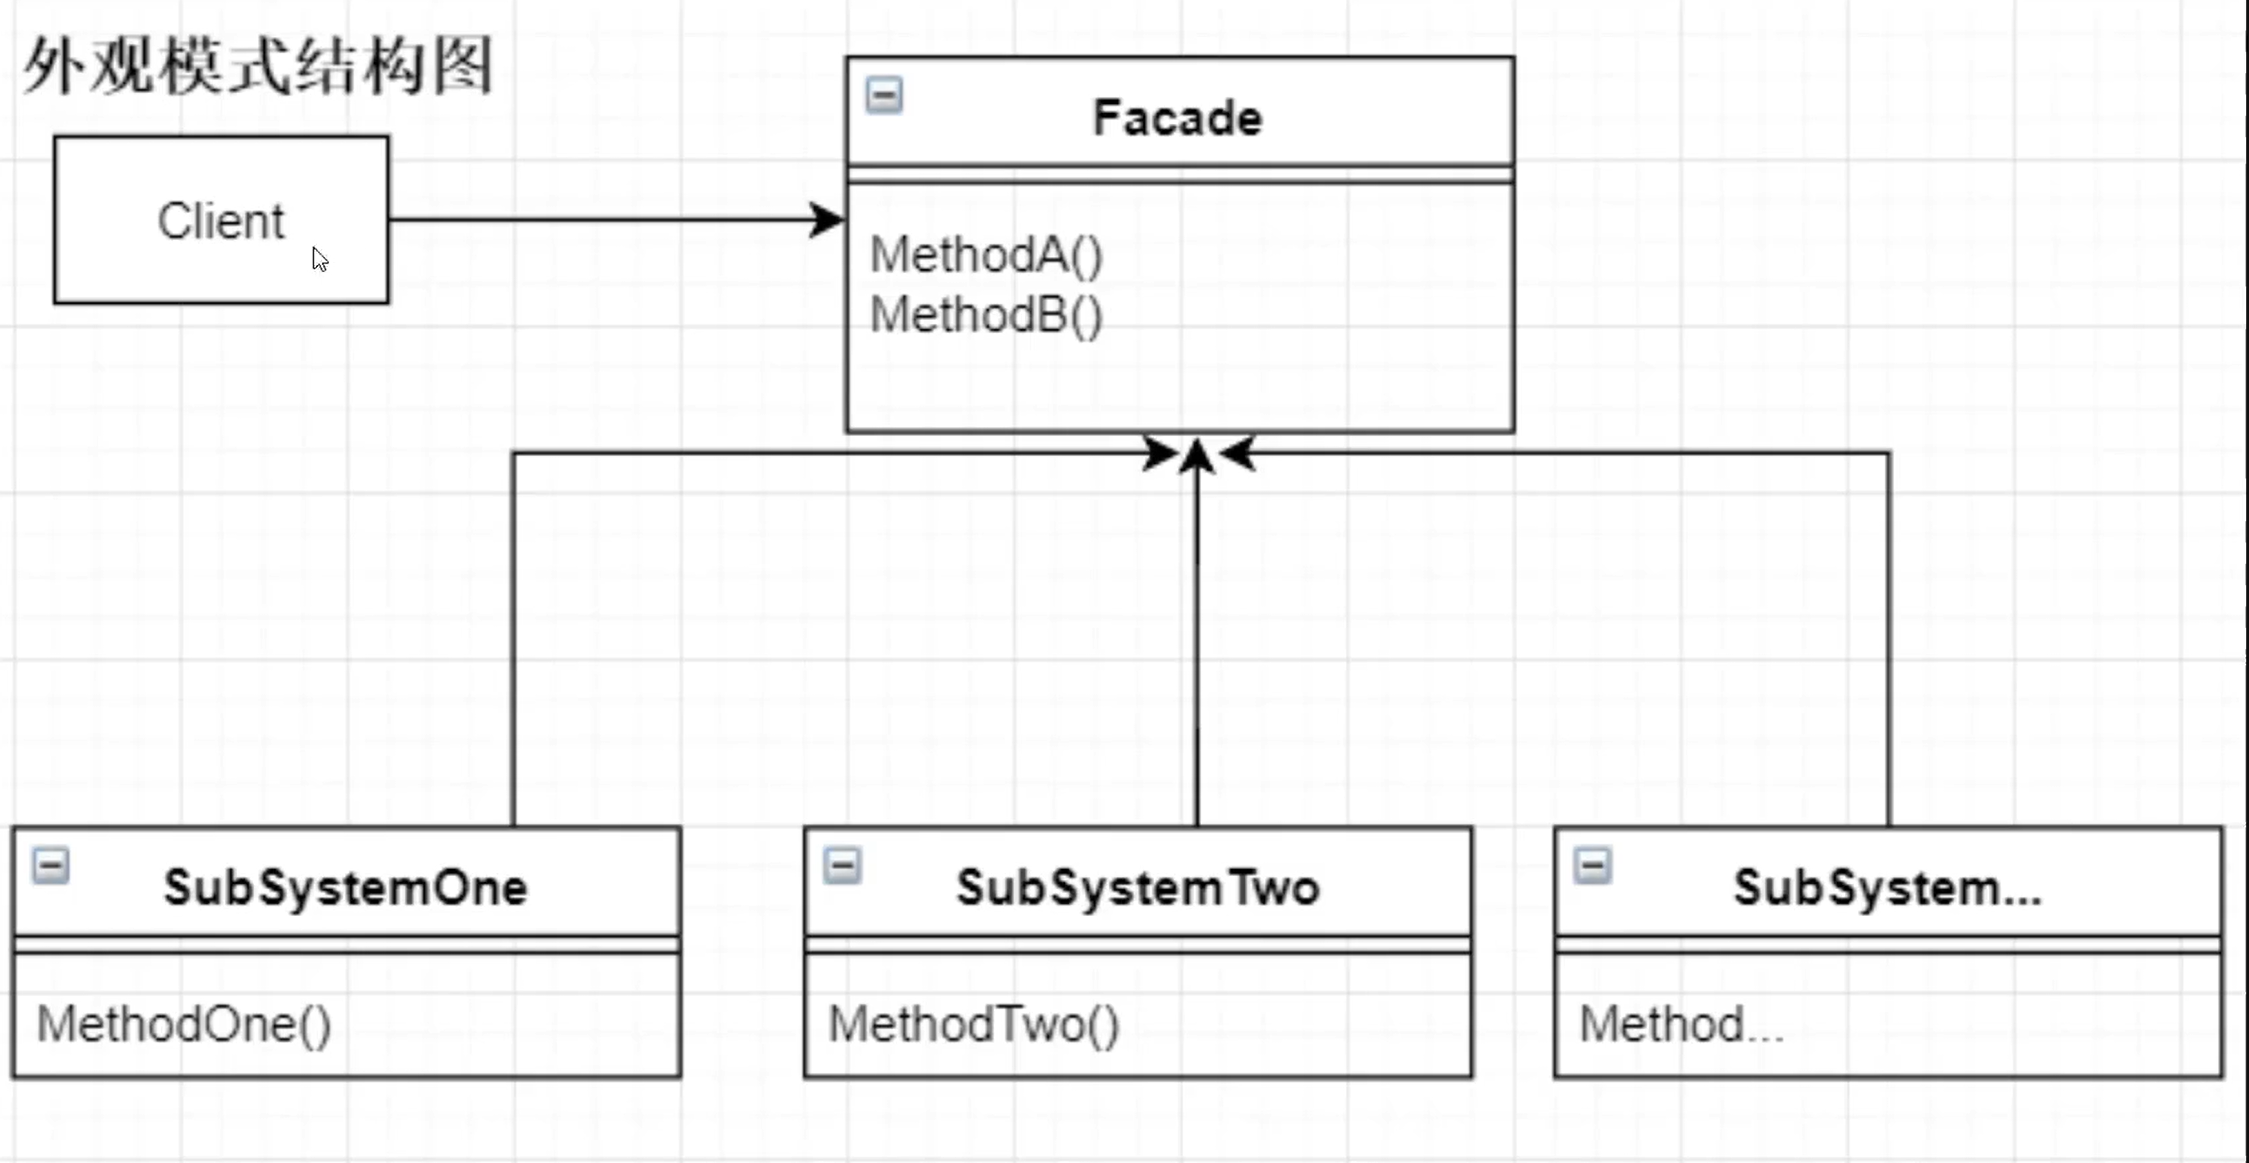
3.2 外观模式

  • 要求一个子系统的外部与其内部的通信必须通过一个统一的对象进行。外观模式提供一个高层次的接口,使得子系统更容易使用。

3.2.1 类图

外观模式类图

3.2.2 代码

1
2
3
4
5
6
7
8
9
// 面相外部的高级
class ZhengWuDaTing {
PaiChuSuo paiChuSuo = new PaiChuSuo();
JieDaoBan jieDaoBan = new JieDaoBan();
DanWei danWei = new DanWei();
public String prove() {
return paiChuSuo.prove() + " + " + jieDaoBan.prove() + " + " + danWei.prove();
}
}
1
2
3
4
5
6
7
8
9
10
11
12
13
14
15
16
17
18
19
20
// 每一个子系统
class JieDaoBan {
public String prove() {
return "街道办";
}
}


class DanWei {
public String prove() {
return "单位";
}
}


class PaiChuSuo {
public String prove() {
return "派出所";
}
}
1
2
3
4
5
6
7
// cient
public class FacadePattern {
public static void main(String[] args) {
String prove = new ZhengWuDaTing().prove();
System.out.println(prove);
}
}

面试-常见设计模式
https://baijianglai.cn/面试-常见设计模式/31d344bd28d2/
作者
Lai Baijiang
发布于
2024年5月5日
许可协议